Showing posts with label byblackbirddesigns. Show all posts

Tuesday, February 2, 2016

Tutorial Tuesday: The 2 Minute Guide to Editing Your iPhone or iPad Product Pictures

The 2 Minute Guide to Editing Your iPhone or iPad Product Pictures

Good product pictures have always eluded me. I would take 100 snapshots of my jewellery to get a handful of useable photos. Natural light is best of course, but isn’t always an option. My father (bless his heart), built me an amazing lightbox (google DIY photo lightbox for ideas). I thought that would be the end of my photography woes, but as it turns out, the editing process has a bit of a learning curve all its own. 

Here are the tricks I (painfully) learned, as well as the step by step guide on how to edit your pictures right on your ipad/iphone without any special programs to get the results above. 
Tricks: 

1. Use the right bulbs. 
This is so important. At live craft sales soft lighting is my go to. White, halogen style bulbs are too harsh and don’t show off jewellery well. I naturally applied the same principles to my lightbox lamps. What I got were dozens of grey-ish photos. Terrible.


The camera sees light differently than the naked eye. The camera loves that stark white light! Halogen away! After some trial and error this was the brand/style that worked best in my set up:


This is the lightbox set up I use:


2. Eliminate as many competing light frequencies as possible. 
My next problem was these horrible wavy stripes or lines in the photos. What were those??


It took some digging online (and lots of clever wording in Google) to find out that those weird lines are caused by competing light frequencies… in other words: turn off all the 
overhead lamps, chandeliers etc in the room. They are interfering with what your lightbox lamps are trying to do. 
You may still have some wavy lines but don’t worry, we can fix that in editing! 

Now that you have a brighter picture let’s edit… 

Let’s start with this one:


I think we can all agree that this is not an Etsy quality photograph. It’s dark and greyish. It has those wavy frequency lines. Terrible. Even though it was taken in my lightbox this picture needs a 2 minute editing session. 

For this mini how-to I will be doing the editing on my ipad, but can just as easily be done on an iPhone. 

Step 1: 
Pull up your picture, and click on the “Edit” button in the top right hand corner. This is what will come up:


Take a look at the row of icons on the right hand side. Skip the “Magic Wand” icon on the top all together. This is for automatically enhancing the photo, and we’re going to be making our edits each manually. 

The second one down is for turning and cropping. Use this one now if there is anything in your photo you want to “crop” out. Make your subject as large as possible without taking it too close to the edge. Third icon down is where the magic happens!


Step 2: 
Let’s work our way down. Let’s start with “Light”. Ignore the sliding scale of mini photos to the right and click on the list icon underneath:


Step 3: 
This will bring up a more specific list. Again let’s work from top to bottom, starting with “Exposure”


Step 4: 
Click the list icon again and move on to “Highlights”. I usually move the red line just a bit lower on the scale, but it will really depend on the photo you’re working with. You will find as you play with this program, the more you practice with different photos, the better you will get at adjusting your specific photos. You will find different and better combinations of these variables that will work for you.


Step 6: 
“Brightness”. Just like in “Shadows”, playing with “Brightness” will add depth to the subject in your photo. 

Step 7: 
“Contrast” seems to sharpen the edges of your subject (or soften, depending on what look you are going for). 

Step 8: At this point I would move on to the “Color” icon.


Step 9: 
Again, once in “Color” I would move straight to the “list” icon at the bottom


Step 10: 
“Saturation” This is where you get your colors to really POP. By sliding the red line up, suddenly the crystal on my Peter Pan bracelet looks fantastically green! Much closer to what this dazzling piece looks like in real life.


Step 11: 
I’ve never had to use the other two tabs under “Color” but if you still feel like your photo background is too beige or grey, playing with the “Cast” can give you more of a clean white. 

BEWARE! Do not hit the third Icon under “Color” which is for changing your photo to Black and White. The reason I say this is because if you do, it will automatically change your beautiful picture to black and white with no way to reverse it without dumping all your hard work and starting over from step 1. Very irritating.


Step 12: 
Presto Chango!


In 2 minutes flat! 

You now have an Etsy worthy photo in the palm of your hand. Just make sure you hit “Done” in the top right hand corner to save your finished product. 

If you are using an iPhone, the look of the icons are the same and the principles are identical, however the icons show up along the bottom rather than the right side of the screen. 

Hope this tutorial was helpful, it took lots of blood sweat and tears to figure out some of this stuff. I know I could have used a similar how-to last year. 

Cheers! 

Post by: Angela Sawatzky 

To view some of the FABulous pictures she took and edited visit her Etsy shop byblackbirddesigns or website www.byblackbirddesigns.com 

Saturday, July 27, 2013

Makers Market - First Friday Every Month!


Every first Friday of the month Frame Arts Warehouse hosts a Makers Market at 318 Ross in the Exchange District of Winnipeg. This is held in conjunction with First Fridays in the Exchange.


There are always at least 1 or 2 WESTies vending there: last month saw Heidi of heidiandseekboutique


Lisa of BitchnKitschnKitchen


Angela of ByBlackBirdDesigns


And Ruth of PeriwinkleDzyns

among many other WESTies and awesomeness. Visit every month for a constantly revolving group of crafters, vintage purveyors, food vendors and live entertainment! See you August 2!

Thursday, August 2, 2012

Canada Day Weekend - WEST Handmade Village - Osborne Street Festival


10 WESTies banded together to create our own hand made village on Osborne Street in Winnipeg over the Canada Day week end. We set up 4 tents of awesome handmade Etsy artisan items!


Amidst a sea of mass produced items we stood out loud and proud!


Marie from YamasMaries table - sorry, I some how didn't get a picture of the lovely Marie! In the back ground is Louise of SoGaSoap, who was my next over neighbour and I somehow seemed to have also missed in my photo taking! Bad bad captain!


Here's some of her subject appropriate soap in lieu of apology!


Jennifer of ToxieDesigns,one or our fabulous leaders!


Sarah of FlatLandersSoapCo


Angie of ByBlackBirdDesigns and Steam Punk Trunk.


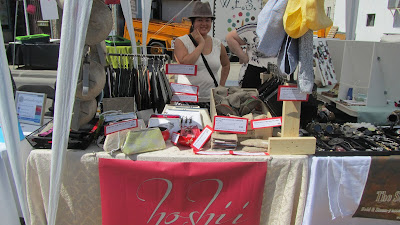
Deb of HoshiiDesigns 


Christa of SecretJewelry and Kat of AeliosDesign


Angie's sign - it sure drew a lot of attention!


Jackie of BranchesandFeathers 


And finally,my table Periwinkle Designs.

Many thanks to the group for all the great organization, support and just plain laughs we had all weekend--couldn't have survived it with out you! ~Ruth

Sunday, July 1, 2012

WEST Summer Promotion: Blackbird Designs


Happy Canada Day everyone!

Today I'm pleased to introduce you to Angie of Blackbird Designs.

Blackbird Designs specializes in steampunk inspired treasures.

From the Blackbird Designs profile:

I can be known as Miss Scarlet Augustus Blackbird ( aka Angela Sawatzky) a self-adored artist, semi-successful tinkerer, soulful adventurer, and SteamPunk enthusiast!

I love drawing, creating, whirling and twirling, sighing, crying, sleeping, creeping, loving, kissing, wishing and whispering, hoarding, exploring, yawning, pawning, feinting and painting

I appreciate art, tinker with treasures, applaud make believe and encourage whimsy!
Enjoy my creations!

__________

Check out this item:


Beautiful genuine Mexican turquoise pendant on silver base metal chain. Perfect colour for summer!


________

If you'd like to keep up with Blackbird Designs please visit the following links:

Blackbird Designs on Etsy
Blackbird Designs on Facebook


_________


And if you'd like a chance to win the item featured above along with 15 other fabulous WEST creations, please visit this treasury link and leave a thoughtful comment on the treasury page.  Simple!


*** Only comments on the treasury itself count for entry into the giveaway.  But you're more than welcome to introduce yourself, ask questions or talk about the very trendy steampunk movement with Angie in the comments below****