Showing posts with label winter. Show all posts

Friday, December 2, 2016

Foodie Friday: Island Style Chicken

As Winter approaches I feel the need for something tropical, and this is a recipe I received from a friend so many years ago. The handwritten recipe card is faded and stained. That's a good sign in my books.


Chicken Island Style

1 1/2 tsp salt
1 tsp. ground black pepper
2 tbsp. oil
1 14 ounce can pineapple
2 tbsp. soya sauce
2 tbsp. cornstarch
1/4 cup cold water
1 cup sliced celery
2 medium tomatoes
1 diced red pepper
1/2 cup coconut
2 large chicken breasts cut into serving portion sizes

Sprinkle chicken with salt and pepper. Brown chicken pieces in the cooking oil in a skillet. Drain pineapple juice into the pan, bring to a boil and add the water, soya sauce and cornstarch. Stir until it thickens, add your vegetables and cook till fork tender. Add pineapple chunks just until heated. I am perfectly happy to eat this without meat. Either way, colourful, tasty and fast to prepare.

Served with rice or rice noodles. This dish keeps well and makes a great lunch at work!


Thanks to Nancy of NancyBloklandPottery for this wonderful recipe.

Sunday, March 2, 2014

Winter Design Challenge Results

Congratulations to Emily from EmmaRuthJewelryCo. Her rose necklace was the favourite in the winter design challenge winning 46% of the 52 votes!


Thanks to everyone who voted for their favourite! Stay tuned for our Spring Design Challenge coming soon! 

Sunday, February 23, 2014

Winter Design Challenge Entries

The theme for the latest WEST Design Challenge was "winter - make the best of it." 

Here are all of this month's entries, in order of submission. There is a poll at the end of this post. VOTE for your favourite submission! The poll will be open for one week, and the winner will receive a special spot of recognition on the blog until the next design challenge!


Andrea from WeAreBoundTogether says "Thinking of spring with the wood burned artwork of this journal. The artwork is my own, which I then burned onto the natural wood using a method called pyrography.  Wood is covered with a thin coating of Danish oil to protect it from age. The book is bound with a Coptic stitch, a method of bookbinding dating back a couple thousand years. Looking forward to seeing the little leaves coming on the trees outside!"


Jenn from BlueCamelBaby says "For me making the best of winter was getting back to sewing something I have missed doing for several years. My sewing machine and serger sat idle covered in dust for far too long. Nothing gets you back in sewing shape like tiny ovals. Here is my entry: the Reusable Scrubbies/Makeup Pads."


Laura from PrariePeasant says "I chose this journal because of the title, Utopia. Living here in Manitoba, we need to look for the positive things around us. While it may not be a perfect place, there are some pretty good things here. We don't have to go to a deserted island to find our Utopia, it can be right here."


Lisa from Bitchin'Kitsch'n'Kitchen says "I've decided on something! These glasses really help take my mind off this ridiculously long winter!"


Marlene from Magination says "As most of us do not wear proper footwear in winter: here's something to help with the low boots that didn't work well with all the snow we've had this winter. These boot cuffs are new to my shop this winter. It's all about fashion and we are tough Canadians so at least your lower shins will look good and be warm. It looks like you may need these in March and April if it doesn't warm up soon!"


Emily from EmmaRuthJewelryCo says "Are you all missing your gardens yet? I know I am! I chose this rose pendant necklace for the challenge. Each one I make is as unique in design and shape as those beautiful flowers that grow in our gardens. I start out with about a foot of plated wire and hand shape it into these beautiful rose shape pendants. The free form creative process makes them all one of a kind - no two are exactly the same, just as in the way Mother Nature creates! The pendant comes dangled on 18 inches of delicate but sturdy chain in your choice of finish."


Vote for your favourite design challenge entry on the poll below. Only one vote is allowed, so be sure to choose your fave! 


The poll will close in one week on Saturday, March 1, at midnight, and the result will be posted on Sunday. The talented winner will receive a spot of recognition on the WEST blog until the next design challenge. 

Sunday, January 26, 2014

Winter Design Challenge

It's time for another design challenge! The theme is here on the blog and the WEST forum on etsy. Take this inspiration in whatever direction your imagination leads. The goal is to challenge yourself, be inspired and enjoy the creative process!


hooded infinity scarf by heidi-and-seek boutique

As you think about the theme, add comments to the discussion thread on Etsy about your process. Take pictures of your process and the finished item and post them in the discussion thread when you are done. It's interesting and inspiring to others to hear the story about how you arrived at your finished product, so go ahead and share a few comments about your process! The results of the challenge will be posted after the deadline, and then voting for your favourite will commence. 

Vogue Knitting Magazine from Bitchin'Kitsch'n'Kitchen

Original Oil Painting 'Hoarfrost In The Pasture' by FieldstoneArt

The new theme for this challenge is Winter! How can we make the best of winter? Make a new pair of mittens, a fabulous scarf, or tea cozy? I know I've spent most of my time inside with some DIY and even some painting. Will you make a new masterpiece? You've got a whole month to come up with your design ideas and create. The deadline for this challenge is Friday February 21, with the entries being posted on Sunday February 23. When the entries are posted, you can vote for your favourite entry. The winner will be featured on the blog side bar until the next design challenge. 

Fox Fur Short Jacket from WildWoodRoseVintage

A few notes:
Create something new, especially for the challenge. Entries for each challenge must be finished by the posted deadline. Vintage and supply sellers are welcome to participate too, with a focus on artful photography and careful choice of item. 

Happy designing! I hope this challenge and the few ideas I found in WESTie shops inspire you! 
Ready... Set... Get Creative! 

Wednesday, June 8, 2011

W.E.S.T. June Design Challenge Canada Day

Summer is here in Winnipeg... finally!

And I'm looking forward to Canada Day! Fireworks, BBQ, freak prairie thunderstorms, maple leafs and beer. Yay!

This month's design challenge is all about Canada Day.

The topic is wide open to interpretation. What does Canada mean to you? Will you take inspiration from the maple leaf? Or the Canada Goose? Will you think about our favourite pastime.... beer drinking! Haha I bet you thought I was gonna say hockey?

Maybe you'll think ahead to Canada's favourite season and design something for winter. Maybe you'll design something out of recycled materials thinking about how beautiful you want to keep our country's environment. Maybe you'll go out into this wonderful land of ours and snap a photo or find a Canadian made treasure in our vintage shops.

I'm excited to see the results!

Here's some inspiration already in existence in our WEST members' shops:


Vintage Canada Map Coasters - Jonathon Wayne Designs


Here's how it works. Check the ning and blog at the start of the month to get the inspiration topic. As you mull over what that particular idea means to you, jot down some notes in the discussion thread or leave a comment on the blog. Take pictures of your process and finished item and post them in the thread or in the Flickr group (with the tag W.E.S.T._dc). We would love to hear the story behind how you arrived at your finished object! I will blog the results of each month's challenge.


A few notes: Create something especially for the challenge. Entries for each month should be finished by the last day of the month. Vintage and supply sellers are welcome to participate, too, with a focus on artful photography and careful choice of item.

Happy Creating!

Monday, February 7, 2011

January Design Challenge Projects


This was the inaugural month for the W.E.S.T. design challenge, and we have some great projects to share with you! We worked with the theme of winter forest. It is so interesting to see what direction a couple of words will take creative people in.


Nancy of Nancy Blokland Pottery created these gorgeous mugs and plate. Nancy was inspired by the tranquility of winter and the muted colour palate found in this season. She writes:

"I often find that winter is a blurry sky, cloudy time. The colours I chose for the plate and the mugs are muted and soft, like snow. I am happy with them, subtle as they are in their suggestion of a winter forest."


Lisbeth of Daisy Patch Designs knitted a sweet DS cozy for her son and a beautiful cabled hat and mitten set. Lisbeth had this to say about her projects:


"I made the Nintendo DS cozy for my 5 year old son (a special request he made, how could I refuse) and listed it on my Etsy site as a made to order cozy. I think that cozies were part of the Etsy January challenge but may not fit so much in the winter forest theme...


As for the hat and mitten set, I bought the wool at an estate sale. It was very soft (and vintage). I ran into a few problems finishing up the right mitten as I ran out of wool. Try and find some vintage wool!!! So I had a skein of extra virgin wool that was very close in colour that I used to finish the project. It was a close call! LOL
My set is something you would wear on a wintry walk in the forest.
I listed it on my site however, my husband took a shine to it and decided to buy it for himself."

You can find the DS cozy and a very similar cabled set at Daisy Patch Designs.


I've been wanting to change up my packaging for sold items in my etsy shop for awhile, and this was a great opportunity to create something new. My winter forest inspiration came from our drive to The Pas to visit my in-laws this January. If you've ever made this trip, you know how lonely this road is. It's literally nothing but snow and trees in the winter. The landscape is absolutely pristine, and incredibly beautiful. I wanted something that would look wintery and since I've been seeing birch bark almost everywhere it's really grown on me. So far, I've been using them with white tissue paper wrapping finished with natural hemp cord as ribbon. These are balsa wood decoupaged (for lack of a better term) with birch bark and then varnished.

Thanks so much to everyone who participated in January's design challenge!

Tuesday, January 18, 2011

Tutorial Tuesday: Cozy Upcycled Fabric Earmuffs


It's cold out there! And it will be for at least another 2 months here in Winnipeg, Manitoba, Canada. So I might as well be warm and fashionable, and use up some of my upcycling pile while I'm at it.

These cozy fabric earmuffs are fun and fashionable! And they don't have any of those awful plastic pieces that bite into my head and pull out my hair when I try to take them off.

Wanna make a pair for yourself or perhaps gift a pair to a loved one?

Fit:
Adult size medium. They fit me and they stretch to fit a bigger head with bigger brains too!

Time Needed:
About a half hour.

Skill Needed:
A little tricky with the elastic and sewing the earpieces to the headband. I'd say about medium skill.

Supplies Needed:
- About 0.25 metre of fabric (I recommend fleece for cozy comfort - an old sweater also works wonderfully)
- Scrap of Quilt Batting
- 4 inches of elastic (I use scraps that I pull from various "to be upcycled" clothing)
- matching thread
- 2 safety pins
- free downloadable pattern - located here

Step One:
Download the pattern PDF and print. I apologize for the lightness of the ink. I couldn't find my marker and then I had a whole thing about getting my scanner to work with my new OS. Bleh. If I get in the mood to figure out how to darken it (or find my marker) I'll fix it.
Cut out 1 headband piece (on fold) from chosen fabric
Cut out 4 Ear Pieces from chosen fabric (you can use fleece for inside and decorative fabric on outside if you wish)
Cut out 2 earpieces from quilt batting
Cut out 1 (on fold) of bottom band from chosen fabric
Use the bottom band piece to measure how much elastic you need - this time, don't cut on fold. It should be close to 4 inches.


Step Two:
Fold both the headband piece and the bottom band piece in half lengthwise. Sew along the long edge. Use a safety pin (or your own desired method) to turn both pieces right side out. If you'd like a puffier look to your top headband piece, you can use a piece of quilt batting on the inside as well.


Step Three:
Layer the headband piece, the earpieces and the quilt batting in this order.
One earpiece (right side up) - this would be the piece you intend to be on the inside (touching your ear)
The headband piece with the seam in the middle facing down
One outside earpiece (right side down)
One piece of quilt batting

Repeat for the other side of the headband.

You'll get something similar to the picture below. Make sure everything lines up and that the earpieces are all placed together with the headband piece as shown.


Here's another picture from a different angle to give you a better idea of what you'll have when you pin it together


Step Four:
Starting close to where the headband piece and the earpieces match up (along the bottom of the earpieces) sew carefully around the earpieces, making sure to leave a hole where the headband piece is.

(Don't you just love my quick GIMP work? Hehe, not so good with the paintbrush tool, but you get the idea)


Turn the earpieces right side out using the hole you left in your stitching.


Step Five:
Carefully pin the elastic to one end of the bottom band with a safety pin. With another safety pin inserted at the other end of the elastic, carefully thread the elastic through the bottom band. The bottom band will be longer than the elastic, so be careful not to lose that elastic in there!
Without losing the end of the elastic, pin the bottom band to the bottom of the earpiece (where you left the sewing hole in the above step). Do the same with the other end onto the other other earpiece.
Stitch the hole closed making sure to capture the end of the elastic and the bottom band within the stitching. Do the same for the other ear.


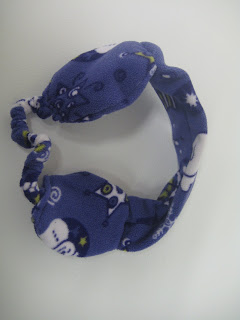
Ta Da! If you can get through all that weird and funky sewing, you will have a cool pair of earmuffs!


And of course, if you don't want to try out all that weird and funky sewing, you can purchase a pair at Tawny Bee. The above purple fleece pair is available here.


I also have a sweet red checkered pair, with red fleece inner ears - available here.


You can also cut out a silly sweater, making sure to get something cool on the ears. This Bear Bottoms one is a little cheeky and super soft and warm - available here.

Corduroy also works as a great outer fabric with a soft velour on the inside of the ears. This pair is available here.

And because I believe is sharing, you can use my pattern in whatever way you see fit. You can make a pair for yourself, a friend, a gift, or make them to sell - of course I won't complain if you'd like to put "Tawny Bee Pattern" on the description of the earmuffs you sell ;) Whatever you like! Enjoy!

____

This tutorial was originally featured on my blog The LT Experience on January 13th, 2011

Tuesday, November 23, 2010

Old-School Winter Activity Sheets


Winter has certainly arrived across the prairies! The air is crisp, and there is lots of snow on the ground. It's a season of simple pleasures for me, when I am reminded how lucky I am to have such a wonderful family and live in such comfort. I always find the first few snows make me feel lost in time. Under a thick blanket of snow, our ability to travel is limited and we're able to focus on the world immediately around us.

My love of winter isolation has inspired me to share some activity pages from a wonderful 1941 children's book, Creative "Make and Do" Activities - Series One." Think of a time before television, when the fireplace and wood stove were likely the main sources of heat in the house, and urbanization was just beginning across the Canadian heartland. The Great Depression had just ended and World War II was being fought across the pond.


Books like these were the activity kits of their time.


Aren't the fonts wonderful!


I love the fine detail in this activity. Imagine trying to cut out all those little shapes as a child - I think this would be a tough one for me now!

I have included large copies on my flickr page, if you're interested in printing these out to try with the little ones in your life.

Happy winter!