Thursday, February 24, 2011
Thrifty Thursday
Those of you familiar with me or my Etsy shop know how I love to be thrifty with my craft supplies.
I thought I'ld share some of my favorite tips for getting the most out of your craft dollar.
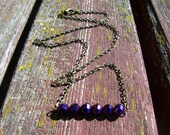
1 - Use what you have - yes, I know that's an obvious one but before you head off to the nearest big box craft supply store take a peek in your supplies, maybe you already have something that will work? or something close enough that will take your project from drab to fab? I included the brass earrings above because when I first started making jewellery from computer parts I rarely mixed them with anything from my "regular" jewellery stash - then a friend encouraged me to think outside the box with my supplies - and voila! I now love pairing together the unexpected.
2 - Use coupons - not just that weekly coupon from the purveyor of plastic made in China supplies that shows up in your mailbox every week but check your favorite Etsy supply shop, many have coupon codes for returning customers or seasonal specials you can take advantage of, ask them!
3 - Shop outside the normal confines of the craft store. The dollar store, grocery store, hardware store, art supply store - all can be inexpensive sources of materials you would pay way more for at the mall or large craft chain store.
4 - Thrift, church, charity, consignment, used, pawn stores, restore - whatever you call them, they are all fabulous sources of new and lightly used supplies or items just waiting for a new purpose. And the best place to consistently find vintage items at reasonable prices. Their prices can really vary and yes, some contribute less to charity than others but buying at any of them helps to reuse items!
5 - Garage sales - people get tired of hobbies all the time and clear out their left over supplies
6 - Garbage picking - see something interesting at the side of the curb or in an accessible dumpster! go for it! just be careful, some items are not worth the bed bug risk.
7 - Supply Swaps - got a bunch of friends with unwanted or excess supplies? hold a supply swap! it works for clothes and baby items, why not craft supplies?
8 - Kijiji, UsedWinnipeg etc. - online sources for no longer wanted supplies from some discarded hobby or estate.
9 - Clean out our supplies on at least an annual basis. Confine yourself to a set amount of space and keep your supplies labelled and organized. It doesn't matter how great a find or deal it is if you don't have space for it or you can't find it when you need it.
10 - Have fun! If finding thrifty supplies is more work than it's worth for you, then reconsider your approach. For me, finding a bargain or a treasure is half the fun but if that's not your thing that's ok too! The point of being thrifty is to be mindful and respectful of our valued resources: our time, our energy and our money. Do so in the way that works for you!
I hope this gives you a few ideas - would love to hear in the comment section what you do to be thrifty with your supplies!
Saturday, February 19, 2011
'Purple Is The New Red' by thesilveragenda
A few lovely purple items from my fellow W.E.S.T.E.R'S
![]() $38.00 | ![]() $35.00 | ![]() $30.00 | ![]() $18.00 |
![]() $15.00 | ![]() $55.00 | ![]() $35.00 | ![]() $6.00 |
![]() $73.00 | ![]() $18.00 | ![]() $15.00 | ![]() $60.00 |
![]() $29.00 | ![]() $7.50 | ![]() $20.00 | ![]() $18.00 |
Getting ready for Spring???
I guess that means I need to get up my courage and my warm clothes and work with the Kiln sitting in my garage.
Tuesday, February 8, 2011
Tutorial Tuesday: Aged Paper
I spent last week devouring Jane Eyre. I am not a big fan of cutesy Valentine’s Day romance, but tragic, gothic victorian love affairs are definitely my style. This week, I’ll show you how to create the base for your own gothic love letter: aged paper.
This method involves first thoroughly soaking the paper, then drying it in a warm oven. I like baking the paper after staining it because it adds great texture and a fragile quality. It’s important to have your paper cut to the desired size, otherwise you’ll end up with an undyed edge where the cut is made. The paper will curl when first removed from the oven, but pressing it for a day or two under a heavy book will fix this problem.
For this project you can use either tea or coffee. Using tea will result in a fairly subtle light brown or beige colour, while coffee creates a darker, greener stain. If using coffee, I suggest adding a bit of vanilla extract to the soaking liquid to offset the weird smell.
This aged paper works wonderfully for any project! I made some tags using this method (with coffee) and screen printed little rabbits on them with my gocco. I think this would also be great for creating a treasure map for your kids (or pirate-obsessed grown-ups).
Skill level: Very easy
Materials:
a pot of strong black tea or coffee, hot or cold
paper (white or patterned) cut to desired size
flat bottomed glass cake pan (8” x 8”, or 13” x 9”, depending on the quantity of paper)
foil lined cookie sheet
an oven
Instructions:
Heat oven to around 250 degrees F and brew your tea (or coffee) if you don’t already have some cold stuff ready.
Pour your tea (or coffee) into the cake pan and submerge your paper. Allow them to soak for about 5 minutes, or until completely permeated by the liquid.
Carefully remove the paper from the pan. Arrange the pieces on the foil lined cookie sheet. Make sure that the pieces do not touch each other. Let them sit for a couple of minutes.
Bake in the oven for about two minutes. Keep a close eye on them and USE CAUTION! They will dry out quickly, and I certainly don’t want you to have a fire! Take the cookie sheet out and gently lift the paper off the foil . This allows the bottom to dry evenly. Return baking sheet to the oven until the tags are completely dry, about one to three minutes more.
Remove the aged paper from the oven. Allow it to dry for an hour or two, then press under a heavy book to flatten.
You can embellish the paper with stamps, burns and ink splotches. Use a calligraphy pen to write your note. If you’re really enthusiastic, seal the letter with a wax seal, or tie it up with a ribbon and drop it into an old bottle. Your gothic Valentine’s Day love letter is ready to give to your beloved.
Monday, February 7, 2011
January Design Challenge Projects


Sunday, February 6, 2011
Perfect Winter Day
At least that's the plan.
Friday, February 4, 2011
W.E.S.T. Design Challenge: February Inspiration is Geometry Class

Tuesday, February 1, 2011
Tutorial Tuesday: Boy Cut Panties

Who doesn't need a cute pair of underwear? And for some reason, men go super ga-ga over this style of panty.
Do you want them? I've already sold these ones, but I can show you how to make your own. Yay!
But if you're still a little unsure, you can purchase these psychedelic purple ones or these ones with construction trucks on them at Tawny Bee.
This tutorial originally appeared on The LT Experience on June 3, 2010
If you would like to see the regular cut panties tutorial, leave a comment below and I'll include it in a future WEST tutorial Tuesday. :)
Cheers and Happy Tuesday!
- Tawny