Showing posts with label vegetarian. Show all posts

Friday, July 15, 2016

Foodie Friday : Fried Pickles!


The best part about having pregnant pals is having people to regularly snack with. It was Canada Day in the Great White North not long ago, my pal Amanda of Siver Moose Arts and I hit Osborne Village for Streetfest and experienced all sorts of walking, talking, laughing and grumbly stomachs. Amanda also experienced "frickles", which are cheesy, eggy deep fried pickles that I haven't had in a minute. Our evening ended some early. I worked on the Etsy shop, pet two VIP bunnies, then made the greasiest decision of my long weekend. This recipe makes about 20 little "coins" - don't let the guilty-of-being-hungry photo fool you.

Ingredients I - Batter
1 cup soy milk
2 tbsp lemon juice

Ingredients II - Dry
1 tbsp nutritional yeast flakes
2 tbsp cornstarch
3 tbsp white flour
1/2 tsp black pepper
1/2 tsp cayenne pepper
Massive pinch of salt

Dill pickles - sliced or quartered

Oil for frying

I used a tiny vintage enameled cast iron pan and filled with 1/4" oil. Turn your stovetop up to medium high (I hit mine up to 5/7)

Combine Ingredients I in a cereal bowl, let sit for five minutes. 

In a separate, small bowl, combine all of Ingredients II.

Cut pickles. Be extra sure to dry them on paper towels! Ever had an oil burn? Ever struggle to sound like that resulting scar tissue was from something way cooler? Dry the pickles up good. Toss them in the bowl of batter, which is acting as your buttermilk, with one hand. Drop in your bowl of dry starch, and mix with your other, clean hand.

Slowly slide them pickles in the hot oil. I fried mine for about 2 minutes per side. These little dandies are done when golden brown. Place on a plate with newspaper to get some of that grease outta there.

Eat 'em up with spicy mayo, ranch, etc. Essentially, any of Follow Your Heart's dressings will do the job JUST fine.

Need a dip quick? Mix up 2 tbsp vegan mayo + 1 tsp Sriracha and thank me later.

Find more recipes over at The Hardcore Herbivore!

Friday, March 4, 2016

Foodie Friday : Summer Squash Soup with Coconut Milk and Banana

Hi everyone! It's Foodie Friday and I'm back again this week to share another recipe that I whipped up intuitively. This time it's a soup and while I apologize for the absence of measurements to accompany each ingredient, this dish welcomes even more flavour flexibility, so you're able to fine tune it as you wish :)


Summer Squash Soup with Coconut Milk and Banana


Ingredients:
  • Summer squash
  • Bananas
  • Fresh or dried garlic and onion -- I used both
  • Water
  • Spices: coriander seed, red chili flakes, cardamom, ginger, cassia, turmeric, clove and nutmeg
  • Coconut milk (if desired)
  • Minced herbs for garnish (if desired) -- I used chives and shiso leaf

Method:
  1. Wash, peel, de-seed and chop/cube summer squash
  2. Sautée squash in a well heated pan with olive oil with a bit of dried onion until lightly golden on all sides. If you're making a lot of soup using a lot of squash, you may need to do this in multiple batches. In either case, when finished, set it aside. The purpose of sautéing in advance is to enhance the natural flavours of the ingredient before boiling it into soup. This step also helps the squash cook faster, so you can dig into the soup faster :)
  3. Using the same pan, sautée bananas into a mushy consistency, and put them aside as well.
  4. In a soup pot, brown finely diced onion and garlic until the scent increases, then add the squash and banana and stir everything together.
  5. Once stirred, add enough water to cover the contents of the pot.
  6. Add the spices mentioned above to taste, and don't be shy about the quantity. You might have noticed this recipe doesn't use soup stock, so all of your flavour will come from the ingredients you've added, including these spices.
  7. Allow the soup to boil briefly, then lower the heat to a simmer
  8. Taste the blend and add more spice if desired
  9. Allow the soup to simmer until the squash has soften enough to either transfer to a blender, or use an immersion mixer to purée everything to your desired consistency.
  10. Ladle the soup into bowls, heavily pour coconut milk so it creates an aesthetically pleasing swirl and top with fresh  fresh herbs for garnish. 

You will probably have left over coconut milk. If so, add it to the leftover soup still in the pot and stir -- tomorrow's soup will taste different without any work to create variety ;) Whooo! Who says leftovers are boring? *lol*

Enjoy!!


Post and Recipe by: Milena from Just the Goods 
Check out her Etsy shop HERE

Friday, February 26, 2016

Foodie Friday : Eggplant with Pomegranate and Tahini

Hi! This is Milena from Just the Goods, and this is my first contribution to WEST's deliciously awesome series, Foodie Friday.

When I make skin care products, I follow my own formulas very carefully, measuring to the milliliter and/or gram. However, when I'm in the kitchen, I like to cook intuitively and take inspiration from whatever ingredients I happen to have on hand at the time. As a result, I don't think I've ever cooked the same thing twice, but sometimes I have the *same* ingredients on hand, so I try to mix them up in different ways. This vegan seared eggplant with pomegranate seeds and a tahini dressing was created under such circumstances. I didn't keep track of quantities, so I hope you'll pardon the lack of measurements and take this as an opportunity to adjust ingredients to your personal preference :)

Eggplant with Pomegranate and Tahini


Ingredients:
  • Small/young eggplant (I prefer Chinese long eggplant for this type of preparation method, but I imagine any variety will do)
  • Olive oil
  • Sumac, cinnamon, cloves, salt (I like Himalayan pink salt)
  • Pomegranate syrup
  • Tahini
  • Lemon juice
  • Fresh pomegranate seeds
  • Sesame seeds, cilantro or parsley, and/or chives for use as flavour enhancing garnish

Method:
  1. While washing and cutting each eggplant in half cross-wise, heat your frying pan or griddle
  2. Brush both sides of the eggplant with olive oil
  3. Dust the flat interior side of the eggplant with sumac, cinnamon, cloves and salt.
  4. When the pan is hot enough, oil your pan/griddle, then place the eggplant flat, seasoned side down.
  5. When the eggplant is half-way done searing, add some pomegranate syrup to the pan, and allow it to caramelize gently, then flip the eggplant
  6. While the eggplant is searing, make your tahini based sauce by whisking together tahini, lemon juice, some of the spices mentioned above, plus a bit of the sweet pomegranate syrup used earlier
  7. To help the eggplant cook through evenly without burning, flip the eggplant three times to cook each side twice instead of once, and cover the eggplant while cooking with a well fitting lid so it partially steams while searing. Keep an eye on it while preparing your sauce and garnish.
  8. While still hot, plate the eggplant flat side up, drizzle with tahini sauce, more pomegranate sauce (for flavour and complimentary colour) and sprinkle with fresh pomegranate seeds, sesame seeds, cilantro, chives etc., then serve and enjoy!
I hope you like this dish! It is an awesome side dish, but equally delicious as a main if you happen to make enough of it ;)

Post and Recipe by: Milena from Just the Goods 
Check out her Etsy shop HERE

Friday, February 5, 2016

Foodie Friday ft Peanut Curry

Foodie Friday with Caitlin of Real Swanky! Today in Caitlin's kitchen, we whip up a rich, peanutty massaman curry served with rice and garnished with peanuts. Vegan friendly, gluten-free friendly, and can be easily subbed with ingredients of your choosing to be mindful of likes/dislikes/allergens, etc. Enjoy!


A rich, nutty curry with a slight bit of heat to it. I served mine over rice with a peanut garnish. If you've ever stepped foot down the ethnic aisle at your grocer I'm sure you've seen Cock Brand canned and bottled goods. The little rooster logo isn't quick to miss, and the items are always very reasonably priced. Here are just a few familiar items. The curry pastes are my FAVOURITE and set me back a toonie at the best of times. They last ages and refuse to expire, really. I highly recommend 'em. On to the recipe.

*If serving with rice, get started on this now before prepping your curry.

Ingredients I
4 cardamom pods
1 tsp cumin seeds
1 tsp coriander seeds

Ingredients II
1/2 white onion
1/2 cup coconut cream
1 tbsp curry paste (I used this brand) or to taste
1 tbsp coconut oil
2 tsp lemon grass
2 tsp vegan fish sauce or Kikkoman soy sauce
1/2 tsp salt
1/2 tsp course black pepper

(Toast all of Ingredients I in a frying pan on medium for 3-5 minutes. Place in a coffee grinder/mortar and pestel until ground to a dust then place Ingredients II and grind to a paste.)

Ingredients III
1 can coconut milk
3/4 cup peanut butter

Place all Ingredients I, II, and III in a small pot and stick on medium high. Allow this to come to a boil for a few minutes, than simmer on low to thicken.

Bring to a boil 2 cups of vegetables. I used: potatoes, broccoli and onions. Boil until fairly tender with a slight bit of crunch. 

Place the vegetables in the simmering curry and stir well.

Serve with rice. Top with peanuts.

Find more rad recipes over at Caitlin's blog, The Hardcore Herbivore!

Friday, December 11, 2015

Foodie Friday : Slow Cooker Borscht for 2-4


Excellent for your 2qt slow cooker, and serves 2-4 for about $2! Recipe by Caitlin of Real Swanky.

Ingredients
1 large beet (yielding approximately 1 1/2 cups), peeled and chopped into 1/2" cubes or shredded
1 small onion (yielding approximately 3/4 cups), chopped
2 potatoes (yielding approximately 1 1/2 cups), chopped
1 cup cabbage, shredded
2 tbsp fresh dill
1 1/2 cups water + pinch of salt or vegetable broth

Place all ingredients in your slow cooker on high for 4 1/2 hours, or, on low for 8 1/2 hours. Taste test to ensure the beets are soft yet a little firm, and no longer crunchy.

Optional: Place 1/3 to half of the solid ingredients in a blender with a small scoop of the brother. Blend. For a bisque, blend all until smooth.

Optional: top with a variety of garnishes such as dairy free sour cream, cashew cream, lemon juice, vineagar, more fresh dill, etc!


Find more recipes on Caitlin's blog,

Friday, October 23, 2015

Foodie Friday : veggie meatballs - great for pasta, potatoes,subs and more!


Recipe from Caitlin, over at Real Swanky!

Baked veggie-based meatballs that hold their form! Finally. Made up of tofu, TVP, vital wheat gluten and a whole heap of spices, these bake up in under 20 minutes with 10 minutes prep time. Because of the hearty amount of spices and small amounts of typical "binders" and meat-substitute staples, you don't get the overwhelming amount of tofu / TVP / wheat gluten which is a welcome change. Don't be overwhelmed by the ingredients list - a huge part of the list is spices. Add your favourite spices if these seem too 'Italian' for you. Try Cajun themed, garlic and onion based, and so on. Allowing these to cool for about 5 minutes will yield a firmer meatball. 

Upon calculating the grand total for this recipe, I found this entire recipe to cost me approximately $3.20 - right on!

For storage: Freeze, refrigerate, or eat 'em in a worrisome hurry - it's up to you. To re-heat: bake, fry, or nuke 'em.

This batch makes 25-30, depending on the size. I used a heaping teaspoon of the mixture for mine and got 26.

This recipe takes 1 bowl, a few spoons and a food processor. Not bad! Reserve the extra tomato paste from this recipe and check out my recipe for Meatball Subs here.

Ingredients I
4 oz extra firm tofu (1/2 cup, or, 1/3 package of Sunrise Extra Firm Tofu)
½ onion
¼ cup sunflower seeds (use any kind: raw, roasted, salted, unsalted..)

Ingredients II
¾ cup TVP
1 tsp garlic (freshly minced or jarred)
¼ cup parsley, finely chopped
1 tbsp cornstarch
1 tbsp arrowroot powder
½ cup nutritional yeast flakes
¼ cup panko
2 tbsp tomato paste
2 tbsp BBQ sauce
1 tbsp vegetable stock powder
1 ½ tsp basil
1 ½ tsp oregano
1 ½ tsp coriander powder
1 tsp paprika
1 tsp hot chili flakes
¾ tsp fennel seed
¾ tsp mustard powder
Salt and pepper to taste

Ingredients III
6 tbsp vital wheat gluten
2-4 tbsp water, reserved

In a food processor, place all of Ingredients I in and select the "chop" function (anything but puree/mince will do). The mixture should resemble something like this:


Next, place this mixture in a bowl and add in Ingredients II. Mix this up a heap until well-combined, and taste test for spices. Add in salt and pepper to your liking. I used 1/2 tsp salt and a big pinch of pepper.

Lastly, add in the vital wheat gluten and stir up until the mixture is good and firm, able to be rolled into balls. Should this mixture be a little dry, add the water in 1 tbsp at a time. I used a total of 2 tbsp water. If your mix is a bit too wet, add in 1-2 tbsp vital wheat gluten.


Roll into balls. I used a heaping teaspoon and rolled up tight. They were about 7/8" in diameter. Grease up a pan (I baked in 2 batches. but feel free to use 2 pans) and fit no more than 6 x 3 meatballs to a pan.


Bake for 10 minutes, flip the meatballs, and bake for 9-10 minutes longer. Remove from oven and let cool.


Serve with pasta, or gravy and mashed potatoes. Enjoy in a sub. Alternatively, brave the storm and create your own IKEA poutine.

Find more recipes over at The Hardcore Herbivore!

Friday, October 16, 2015

Foodie Friday : sesame 'chicken' with lo mein noodles


Caitlin from Real Swanky here, sharing my latest favourite recipe: sesame chick'n with pan fried lo mein noodles. This recipe is quick, easy, adaptable and easy on the change purse! With lo mein noodles setting you back approximately $1.50 (to serve 4-6) and Soya Slices at $1.19 (to serve 6-8), breathe easy knowing you can feed an army on a budget no worries. :) 

Eerily similar to sesame "chicken" at vegan friendly Chinese restaurants. Which are, oddly, freakishly similar to sesame actually-chicken at non-vegan friendly spots in town. Whip this recipe up in 

I picked up my soya slices at Dino's Grocery in Winnipeg's West End. I like Luxmi brand soya slices. Alternatively, check out Bulk Barn for their "So Soya Slices" in Bulk near the TVP and quinoa. One "Bulk Barn"-sized scoop costs approximately $1.25, the slices typically double in thickness after soaking.


Ingredients for Soya Slices
3/4 cup dehydrated soy slices*
2 cups hot water
1 tsp salt
1 tsp pepper
1 tsp garlic, minced
-- Oil, for frying
-- Cornstarch, for frying
-- Sesame seeds, to garnish

Ingredients for Sesame Sauce
2 cloves garlic, minced / 1 tsp jarred garlic
1 inch fresh ginger / 1 tsp jarred ginger
1/2 onion, chopped
1/4 cup rice vinegar
2 tbsp Kikkoman soy sauce
2 tbsp brown sugar
1/4 cup orange juice**
2 tbsp agave
1 tsp Sriracha
1 tsp sesame oil
-- 1 tbsp corn starch + 1/4 cup water, mixed in a cup, kept aside

Ingredients for Lo Mein
Lo Mein noodles
Water for boiling
1-2 tbsp sesame oil
-- Sesame seeds, to garnish


Method for Soya Slices
Soya slices need marinating in hot water to bring them to a chewy, textured, hearty consistency. Bring a kettle of water to a boil. Pour 2 cups of this hot water in a large bowl and add remaining ingredients, all but the ingredients beginning with two dashes. Place a plate on top and let sit for 15 minutes. When 15 minutes is up, it ought to look like this:


Method for Lo Mein
Bring a pot of water to a boil, place your lo mein noodles in. Turn down to a simmer and cook about 4-5 minutes. Drain, then drizzle with sesame oil. In a large pan, fry up noodles on medium high. Stir and break up noodles as they start to brown and crisp up in the pan.

Frying the Soya Slices
In a large pan, pour enough oil in to lightly cover the base of the pan - about 4 tbsp.
Squeeze out the soy slices without breaking them. Coat lightly in cornstarch.
Fry in 1-2 batches (fresh oil for a second batch) for 5-6 minutes, turning as each side turns golden brown and crispy.


Method for Sesame Sauce
Place all ingredients minus cornstarch + water in a pot and bring to a simmer. Once bubbling, add in cornstarch + water mixture. Whisk until thickened and glossy.
**Alternatively, sub the OJ and sweeteners for apricot jelly!

Toss soya slices in sauce, being mindful not to stir in too much sauce.

Top with sesame seeds and serve alongside lo mein.


Sub the soya slices out for any protein of your choosing - just be sure to make up this awesome sesame sauce that keeps for up to a week in the fridge! (Not that you'll have leftovers ;)!)


Find more rad recipes over at


Friday, September 4, 2015

Foodie Friday: The garden is exploding with zucchini, so make Zucchini fritters!


Summer time and the garden is full of good things. Summer in Winnipeg is short, so here is an economical, fun and nutritious meal for your whole family. 


Zucchini Fritters Vegetarian

2.5 cups of shredded zucchini
1 grated potato
half cup of flour
2 cups grated parmesan
1 tsp. salt
2 eggs
2 tbsp. oil


Mix together grated vegetables, flour, cheese, eggs, salt in a bowl until well mixed.  Heat oil in a frying pan, until quite hot. add batter in 2 tbsp. spoonfuls and flatten slightly. Fry until you see the edges get a bit crispy, and flip over to the other side.  Fry until golden brown. Serve piping hot!

Friday, April 24, 2015

Garden vegetable baked fusilli.


Step into the kitchen with Caitlin of Real Swanky! Today we work on a quick and easy baked pasta dish. Incredibly adaptable, quick and easy!


Ingredients I
2 cups dry fusilli
5 cloves garlic
Water, for boiling pasta
Pinch of salt

Ingredients II
1 small zucchini, sliced
1/2 red bell pepper, sliced
6 mushrooms, chopped
1/2 yellow onion, sliced
1 roma tomato, chopped
1/2 tsp basil
1/2 tsp oregano
1/4 tsp salt
1/4 tsp pepper 

Ingredients III
12oz (1 1/2 cups) crushed tomatoes
1/2 cup non dairy cheese - I used a blend of Daiya mozzarella and cheddar

Ingredients IV
2 tbsp butter, melted
1/2 cup panko
2 tbsp nutritional yeast

Optional: flat leaf parsley

Preheat oven to 415F.

Oil up the inside of your dish, which ought to be about 8x12".

In a pot, boil water with salt for your pasta. Once boiling, drop in your garlic and pasta. Bake for ~7 minutes, or until 3/4 way cooked through.

Saute all of Ingredients II while the pasta is boiling.

Once your pasta is al-dente, drain and place in the frying pan with Ingredients III

Stir together and pour into your baking dish.

Top with more cheese if you fancy.

Mix up Ingredients IV and dollop onto your dish. It'll look a little mushy at first, but it crisps up real dandy in the oven.

Bake for 30 minutes on the button, and let cool for 10 minutes or so before serving. Top with parsley if using.


See more recipes over at The Hardcore Herbivore!


Friday, January 9, 2015

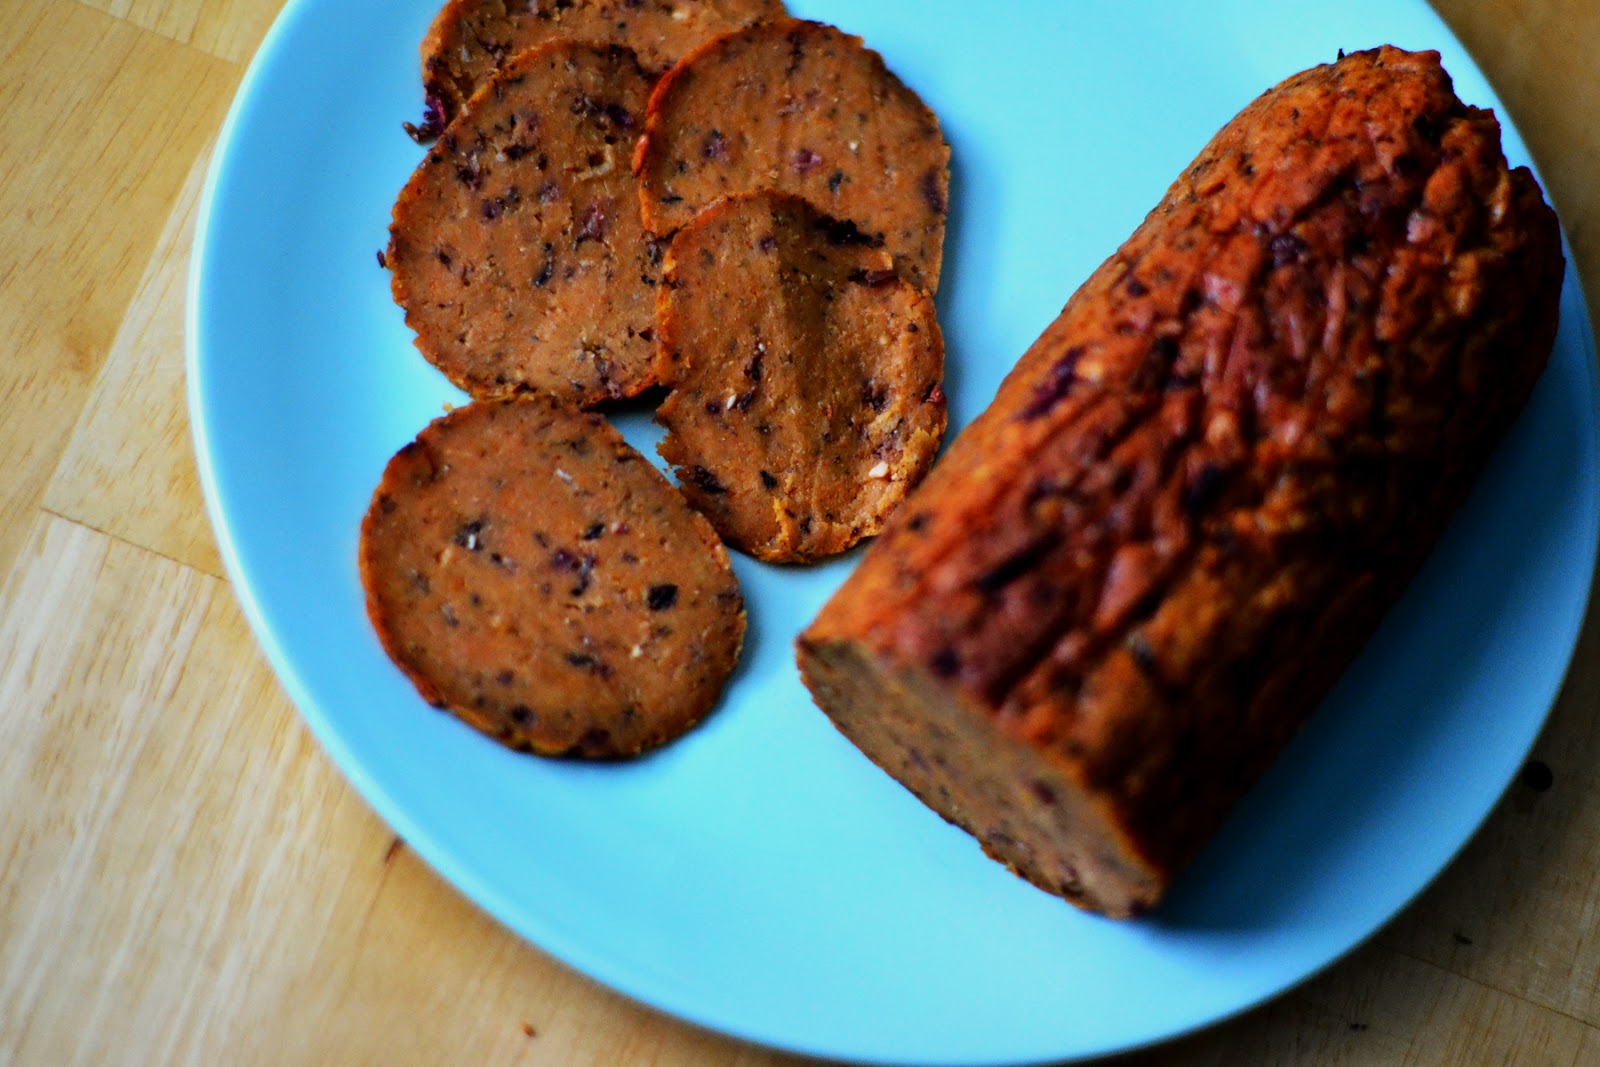
Foodie Friday : Vegan friendly mushroom cranberry seitan roast


Welcome to Foodie Friday! Caitlin of Real Swanky / The Hardcore Herbivore is at it again, this time with her vegan-friendly roast! Flecked with pulsed cranberries and mushrooms, this roast mimics the Field Roast apple-sage breakfast links we can no longer get in Canada


The base of this recipe is vital wheat gluten. It's also referred to as wheat gluten, gluten flour, or vital wheat flour. Bob's Red Mill explains it best, "[...]Vital Wheat Gluten is made from the protein found in the endosperm of the wheat berry, containing 75% to 80% protein. When combined with water it becomes highly elastic and has a taffy-like texture". This is the base of a HEAP of your favourite vegan chinese dishes that contain vegan friendly meats. 

..What are we looking at cost-wise, though?

  • Bob's Red Mill - 632g at Sobey's = $8.99CDN / $1.44CDN per 100g 
  • In Bulk - per 100g at Bulk Barn = $1.20CDN per 100g (being extremely mindful of their $3 of a $10 purchase coupon quite often in full effect.. student and senior's day too) 

Because this recipe calls for about 1 1/2 cups, you're looking at about $2. Plus the cost of spices, which isn't heaps. $2 for over a week's worth of protein? Not bad!.. Besides, aren't we paying, like, $3.50 for 8 thin slices of this stuff?

I found this roast, straight out of the oven, to be really spongy and chewy (in a good, sausage-y way), but once I let it set in the fridge overnight, it firmed up and shaved wonderfully. I have MORE than enough to sauté for breakfast sandwiches, or dice up for pizza and kolaches.

Ingredients I
1 1/2 cups vital wheat gluten
1/3 cup nutritional yeast
1 1/2 tsp salt
2 tsp paprika
2 tsp freshly ground pepper
1 tsp cayenne pepper
1 tsp dried oregano
1/2 tsp mustard powder


Ingredients II
3/4 cup cold vegetable stock or 3/4 cup cold water + 2 tsp powdered vegetable broth
4 tsp tomato paste
2 tsp oil
1 tsp minced garlic
1 tsp chopped basil

Ingredients III - Pulse into very small bits and set aside
5 mushrooms
1/2 an onion, equaling about 1/3 cup
5 tbsp fresh cranberries

Heat your oven to 325F. Get a cookie sheet ready with two pieces of tin foil, stacked on top of each other, that are about the size of your cookie sheet (which ought to be at least 9x9")

In a large bowl, whisk together Ingredients I. In a small bowl, whisk together Ingredients II then immediately stir in Ingredients III. Incorporate your wet mixture, into your dry mixture. Begin by mixing in with a fork, then work with your hands until a moist, slightly sticky dough forms. If you need a bit more vital wheat gluten at this point, add a teaspoon over top your dough ball. Knead for at least 3 minutes to activate the gluten.

Transfer your dough to your tin foil. Shape into a log that's about 8 inches/20cm long. Roll up like a Tootsie Roll and twist the edges, being mindful not to wrap too tightly, as the roast will expand a little upon baking.

Bake for a total of 90 minutes, flipping the roast to a new side after each 30 minute interval.


I sliced my roast up the following morning and immediately made the saddest sandwich of everyone's youth: meat, earth balance, vegan mayo and bright yella mustard. I can't fake sick and watch Price is Right this morning, but that's only because it's Sunday.


Find more recipes over at