Showing posts with label recipes. Show all posts

Friday, August 5, 2016

Foodie Friday : Homemade Salad Dressing for all that green goodness in the garden.

If you don't like the thought of buying mayonnaise or salad dressing that was made in a factory and filled with unpronouncable ingredients, this is a tried and true solution. July and August are when there is an abundance of salad fixings to buy at reasonable prices or even in your own garden. Today at my micro urban farm, I will be harvesting loads of swiss chard, spinach, kale, broccoli greens and beet greens. Time for salad!


This recipe is a family heirloom passed down through three generations. I never knew there was such a thing as mayonnaise until I was well into my 20's. For me this is what you put on potato salad, green salad and the best devilled eggs in the whole wide world!! That is, if you add a little bit of homegrown chives of course.


Grandma Snyder's Salad Dressing

Combine  4 tbsp. flour, 2 tsp salt, 2 tsp. dry mustard, 1 cup sugar in a deep saucepan.
Beat: 4 eggs, add 1 cup white vinegar, 1 cup water.  Add the liquid mixture to dry.

Cook over medium heat, stirring constantly until thick.  Add 1 tbsp. butter after cooking, more salt optional.
Leave to cool and place in a jar with a tight lid, keep refrigerated for up to a month.

Yum!


Friday, February 5, 2016

Foodie Friday ft Peanut Curry

Foodie Friday with Caitlin of Real Swanky! Today in Caitlin's kitchen, we whip up a rich, peanutty massaman curry served with rice and garnished with peanuts. Vegan friendly, gluten-free friendly, and can be easily subbed with ingredients of your choosing to be mindful of likes/dislikes/allergens, etc. Enjoy!


A rich, nutty curry with a slight bit of heat to it. I served mine over rice with a peanut garnish. If you've ever stepped foot down the ethnic aisle at your grocer I'm sure you've seen Cock Brand canned and bottled goods. The little rooster logo isn't quick to miss, and the items are always very reasonably priced. Here are just a few familiar items. The curry pastes are my FAVOURITE and set me back a toonie at the best of times. They last ages and refuse to expire, really. I highly recommend 'em. On to the recipe.

*If serving with rice, get started on this now before prepping your curry.

Ingredients I
4 cardamom pods
1 tsp cumin seeds
1 tsp coriander seeds

Ingredients II
1/2 white onion
1/2 cup coconut cream
1 tbsp curry paste (I used this brand) or to taste
1 tbsp coconut oil
2 tsp lemon grass
2 tsp vegan fish sauce or Kikkoman soy sauce
1/2 tsp salt
1/2 tsp course black pepper

(Toast all of Ingredients I in a frying pan on medium for 3-5 minutes. Place in a coffee grinder/mortar and pestel until ground to a dust then place Ingredients II and grind to a paste.)

Ingredients III
1 can coconut milk
3/4 cup peanut butter

Place all Ingredients I, II, and III in a small pot and stick on medium high. Allow this to come to a boil for a few minutes, than simmer on low to thicken.

Bring to a boil 2 cups of vegetables. I used: potatoes, broccoli and onions. Boil until fairly tender with a slight bit of crunch. 

Place the vegetables in the simmering curry and stir well.

Serve with rice. Top with peanuts.

Find more rad recipes over at Caitlin's blog, The Hardcore Herbivore!

Wednesday, December 16, 2015

Holiday Treats Pt.2


This is a cute way to christma-tize some cupcakes! Here's what you need:

Cupcake mix (I used a simple devils food mix from the store), icing (I made a chocolate buttercream), nilla wafers, small twist pretzels, brown and red m&m's, small mints, mini chocolate chips

Start with your cupcake


1. Add the Nilla wafer 'nose' base


Dab some icing on the M&M and press it onto the nilla wafer


Add the pretzels first (what I should've done in the video), then the mints!


Dab some icing onto the mini chocolate chips, press onto the mints and voila!  Dasher, Dancer, Prancer and Rudolph all wrapped up in a tasty treat!  Click here for the video tutorial.

Reposted from Heidi-and-Seek

Sunday, December 13, 2015

Holiday Treats Pt.1


Last year I made two Holiday Treats that I was able to share on Breakfast TV Winnipeg and I'm here to share the recipes with you!


Here's a fun treat for you to try this Christmas-it's super tasty and SUPER fast to whip up (like 15 minutes max fast!) at the last minute for a gathering!

Here's what you need:

Small pot and glass bowl or double boiler, pretzel sticks, white chocolate melts, Christmas M&M's, Cheerios, and Chex Cereal.
Instructions:
1. Add 3 cups of Cheerios and 3 cups of Chex mix into a large mixing bowl.
2. Add 1 cup pretzel sticks and 2-3 Cups of M&M's (If you love candy canes like me, you could also add candy cane bits here if you like!)


3. Boil water in a pot


4. Put 24oz. (1.5lb) of white chocolate melts into a glass bowl or double boiler in the pot and stir them around until they begin to soften


5. Keep stirring until they have all melted into a lovely goo!


6. Once the chocolate is melted, pour it into the cereal mixture and stir to coat entirely!
7. Pour out onto a sheet of waxed paper, and let it sit for at least 4 hours.  I let mine set overnight on the counter and it was perfect the next day.

Here is a video tutorial on how to make this:


Feel free to try any kind of combinations you like to smother in chocolate, and even try other chocolates!  Here I've done the same ingredients with semi sweet chocolate-yum!


Enjoy!  

Friday, September 4, 2015

Foodie Friday: The garden is exploding with zucchini, so make Zucchini fritters!


Summer time and the garden is full of good things. Summer in Winnipeg is short, so here is an economical, fun and nutritious meal for your whole family. 


Zucchini Fritters Vegetarian

2.5 cups of shredded zucchini
1 grated potato
half cup of flour
2 cups grated parmesan
1 tsp. salt
2 eggs
2 tbsp. oil


Mix together grated vegetables, flour, cheese, eggs, salt in a bowl until well mixed.  Heat oil in a frying pan, until quite hot. add batter in 2 tbsp. spoonfuls and flatten slightly. Fry until you see the edges get a bit crispy, and flip over to the other side.  Fry until golden brown. Serve piping hot!

Tuesday, January 27, 2015

Tutorial Tuesday with DawnMTeasdale -- Homemade Dog Biscuits

Welcome to Tutorial Tuesday! This week, we learn how to make homemade dog biscuits with WESTie DawnMTeasdale with a quick, easy, step-by-step guide packed with helpful illustrations.

This is Ella.


She’s a sweet little girl who has a lot of personality, and is always ready for a treat….

I’d like to share with you a recipe for one of Ella’s favorite homemade biscuits. They are tasty, super easy to make, and the recipe allows for variations, but one of the best things about it is that they can be whipped up in one hour – from start to finish. Once you’re done, you will have 400-500 grams of finished biscuits, about the same size as box of commercially prepared treats, and of course there is the added benefit of knowing that they contain nothing but wholesome ingredients because they're homemade.


Start by preheating your oven to 350°F and then assemble your ingredients -there are only four!

Ingredients
  • 2 - 4oz jars of baby food (this time I used strained sweet potato and turkey, but you could use any variety of strained baby food)
  • 2 – large eggs
  • ½ teaspoon salt
  • 400g (approx. 3 cups) rice flour – brown or white


I normally use brown rice flour so that Ella can share them with her gluten free friends, but you could also use whole wheat flour.

Beat the baby food, eggs and salt together in a large bowl until blended. Then, stir in flour until the dough comes together - you want a soft, slightly sticky dough (you might need a bit more/less flour).


Roll dough into balls (about 1 inch in diameter) and place on a parchment-lined baking sheet.


Flatten each of the balls with back of a spoon; I then poke the flattened balls with a fork, otherwise the biscuits tend to puff up during baking and take up quite a bit more space to store once baked.

Because Ella is small, I cut each of the flattened dough balls into fours using a pizza cutter to make a finished biscuit that can easily be broken into two or four pieces - that way I can break off just the right size for her. If you want a larger finished treat you can skip this step.

The dough is easily rolled out as well, so if you want to get fancy, you can cut it out into fun shapes, or bars using the pizza cutter – just don’t forget to poke them with the fork.


Bake for 30-45 mins at 350°F (it depends on how hard and crunchy you want the cookies to be – Ella likes hers crunchy!) The bottoms should be slightly browned when they are ready.


Remove and cool thoroughly on wire racks before storing. I store these crunchy treats in a brown paper bag.

  • Storage note: If you make a softer treat, you will want to store in an airtight container in the fridge.


Ella’s got a suggestion for variety she’d like to try:

CHEESE PLEASE – she suggests ¼ cup of finely grated cheddar (incorporate it into the flour before adding to the wet mix).


These also make great gifts - your doggy friends will love you for it! 

Friday, January 23, 2015

Foodie Friday : Spicy chai coconut cake with Caitlin of Real Swanky!


Have you tried baking with tea yet? It goes great in little cakes and biscuits. Try out Caitlin / RealSwanky's recipe for spicy chai coconut cake!

Ingredients I
1 cup whole wheat pastry flour
1/2 cup white flour
3/4 cup coconut sugar or white sugar
1 1/2 tsp baking soda
1/2 tsp salt
1 tsp cinnamon
3/8 cup quick-cook oats

Ingredients II
I cup strong brewed chai tea, cooled
1/3 cup unsweetened apple butter
3 tsp white vinegar
Almond extract
Vanilla extract

Ingredients III
2/3 cup pistachios, chopped
1/3 cup slivered almonds, chopped
1/2 cup unsweetened flaked coconut
2 tsp freshly grated ginger

Optional
Additional nuts and/or coconut


Preheat oven to 350F. Grease up your 8x8" baking pan.

In a large mixing bowl, sift together all of Ingredients I. In a separate bowl, stir together Ingredients II and add into your dry mix bowl. Fold in Ingredients III. If desired, shove a few tablespoons of coconut and/or nuts on top of the batter.

Bake for 25 minutes, rotating in between, or until a toothpick comes clean out the centre.

Find more of Caitlin's recipes over at
TheHardcoreHerbivore.com !

Friday, January 16, 2015

Foodie Friday with Caitlin / Real Swanky : Vegan vegetable vindaloo

Happy Friday! Let's see what's cookin' in Caitlin / RealSwanky's kitchen today.


Vegan vegetable vindaloo with homemade curry paste. All spices picked up from Bulk Barn, which is easy on the wallet, no doubt.


Ingredients I - Vindaloo Paste
1 small onion, roughly chopped
3 cloves garlic
2 tsp ginger
1 tbsp hot pepper paste*
3/4 tsp ground cumin
3/4 tsp ground turmeric
3/4 tsp ground coriander
1/2 tsp dry mustard poweder
1/2 tsp whole mustard seeds
1/2 tsp whole fenugreek seeds
1/2 tsp white peppercorns**
1/4 tsp, salt (scrap if your pepper paste already has a heap of salt added)
1 tbsp loosely packed brown sugar
1 small dash of cinnamon 
Reserved 1/3 cup water

Ingredients II - Fresh produce
5 baby Indian eggplants, quartered
1 carrot, chopped into medallions
1 smal roma tomato, chopped
~10 green beans, roughly chopped
1 tbsp vegan butter

Don't Forget --
Rice, quinoa, couscous, etc to serve alongside your curry


* The hot pepper paste I used, was picked up at Sun Wah, an oriental grocery shop in The Exchange District, Winnipeg. This recipe calls for 1 tbsp and I find it's pretty crucial. A tub of this will set you back about two bucks. Be mindful, each brand yields a different flavour, pick a tub with minimal ingredients. I used:


** White peppercorns can be found at your local bulk store. You don't need heaps, and they're cheap as sin. 1/4 cup of these cost about $0.30 :


First off, get some rice/quinoa/couscous started.

Next, melt the butter in a pan. Add in your fresh produce, and place a lid on top. While that's cooking, make up your paste.

To make the paste, I used a Magic Bullet. Place all ingredients inside and add half of your reserved water. Blend until smooth, scraping down the sides after pulsing. Add the remainder of the water, if needed.

The vegetables take about 10-12 minutes to cook through. Once they're done, pour in your curry paste, mix thoroughly, and serve alongside your grain of choice.


Find more of Caitlin's recipes on WWW.THEHARDCOREHERBIVORE.COM !


Friday, January 9, 2015

Foodie Friday : Vegan friendly mushroom cranberry seitan roast


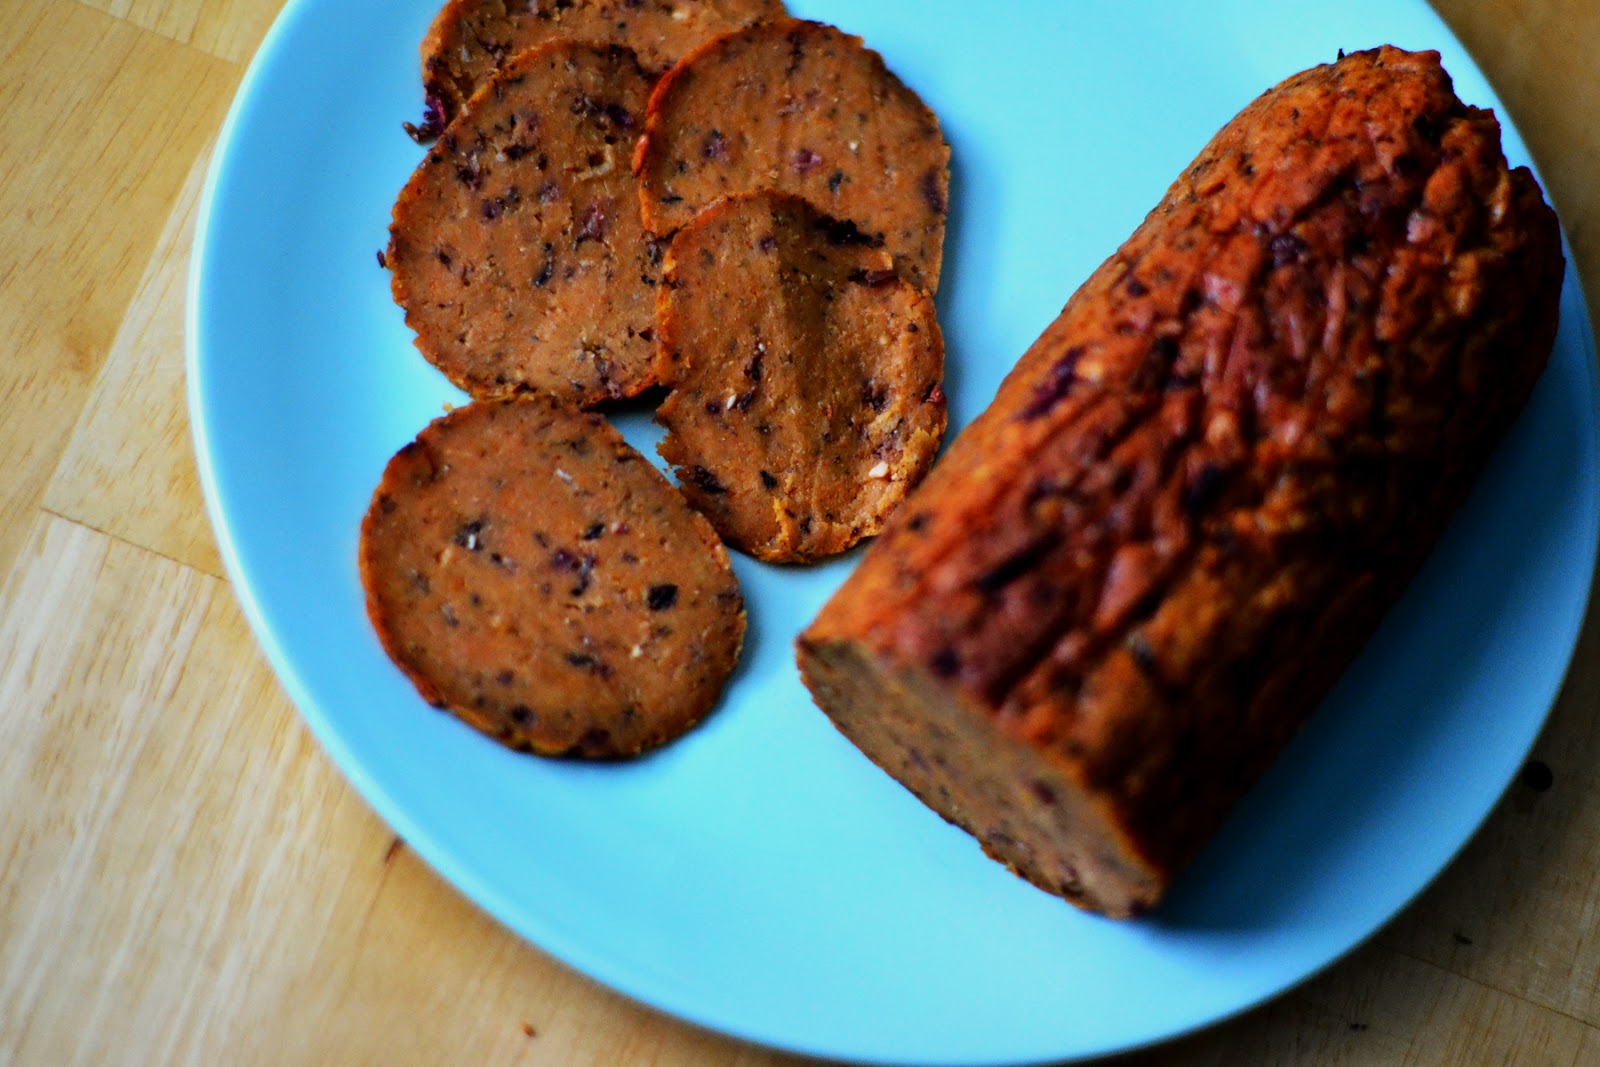
Welcome to Foodie Friday! Caitlin of Real Swanky / The Hardcore Herbivore is at it again, this time with her vegan-friendly roast! Flecked with pulsed cranberries and mushrooms, this roast mimics the Field Roast apple-sage breakfast links we can no longer get in Canada


The base of this recipe is vital wheat gluten. It's also referred to as wheat gluten, gluten flour, or vital wheat flour. Bob's Red Mill explains it best, "[...]Vital Wheat Gluten is made from the protein found in the endosperm of the wheat berry, containing 75% to 80% protein. When combined with water it becomes highly elastic and has a taffy-like texture". This is the base of a HEAP of your favourite vegan chinese dishes that contain vegan friendly meats. 

..What are we looking at cost-wise, though?

  • Bob's Red Mill - 632g at Sobey's = $8.99CDN / $1.44CDN per 100g 
  • In Bulk - per 100g at Bulk Barn = $1.20CDN per 100g (being extremely mindful of their $3 of a $10 purchase coupon quite often in full effect.. student and senior's day too) 

Because this recipe calls for about 1 1/2 cups, you're looking at about $2. Plus the cost of spices, which isn't heaps. $2 for over a week's worth of protein? Not bad!.. Besides, aren't we paying, like, $3.50 for 8 thin slices of this stuff?

I found this roast, straight out of the oven, to be really spongy and chewy (in a good, sausage-y way), but once I let it set in the fridge overnight, it firmed up and shaved wonderfully. I have MORE than enough to sauté for breakfast sandwiches, or dice up for pizza and kolaches.

Ingredients I
1 1/2 cups vital wheat gluten
1/3 cup nutritional yeast
1 1/2 tsp salt
2 tsp paprika
2 tsp freshly ground pepper
1 tsp cayenne pepper
1 tsp dried oregano
1/2 tsp mustard powder


Ingredients II
3/4 cup cold vegetable stock or 3/4 cup cold water + 2 tsp powdered vegetable broth
4 tsp tomato paste
2 tsp oil
1 tsp minced garlic
1 tsp chopped basil

Ingredients III - Pulse into very small bits and set aside
5 mushrooms
1/2 an onion, equaling about 1/3 cup
5 tbsp fresh cranberries

Heat your oven to 325F. Get a cookie sheet ready with two pieces of tin foil, stacked on top of each other, that are about the size of your cookie sheet (which ought to be at least 9x9")

In a large bowl, whisk together Ingredients I. In a small bowl, whisk together Ingredients II then immediately stir in Ingredients III. Incorporate your wet mixture, into your dry mixture. Begin by mixing in with a fork, then work with your hands until a moist, slightly sticky dough forms. If you need a bit more vital wheat gluten at this point, add a teaspoon over top your dough ball. Knead for at least 3 minutes to activate the gluten.

Transfer your dough to your tin foil. Shape into a log that's about 8 inches/20cm long. Roll up like a Tootsie Roll and twist the edges, being mindful not to wrap too tightly, as the roast will expand a little upon baking.

Bake for a total of 90 minutes, flipping the roast to a new side after each 30 minute interval.


I sliced my roast up the following morning and immediately made the saddest sandwich of everyone's youth: meat, earth balance, vegan mayo and bright yella mustard. I can't fake sick and watch Price is Right this morning, but that's only because it's Sunday.


Find more recipes over at

Friday, January 2, 2015

Foodie Friday : Vegan vegetable korma

Happy days, everyone! Has anyone made any New Years resolutions? Let's visit with Caitlin / Real Swanky and see what she's up to in the kitchen!


It's the second day into January and already I've been wanting to cook (lots more) and master a few dishes. I'm happy to report this is a solid recipe for vegetable korma that actually tastes like vegetable korma. No dairy here, just coconut-cashew cream. Serve alongside basmati rice, top with slivered almonds. This recipe serves 6-8 and I'll be making heaps more poste-haste.

Ingredients I - curry paste 
1 tsp ground cumin
1 tsp ground coriander
1 tsp ground turmeric
1 tsp salt
1-2 tsp coarsely ground pepper
2 tsp masala
2 tsp white sugar
1 tbsp grated ginger
2 garlic cloves or 2 tsp minced garlic from the jar
2 tbsp tomato paste
2 tbsp canola oil
1 green chili, seeds taken out
1/4 cup shredded, unsweetened coconut
1/4 cup water

Ingredients II
2 tsp vegan butter
1 onion, diced - about 3/4 cup
1 red pepper, julienned
1 white potato, cubed into 1/2" pieces (steam beforehand to save you some time later on) 
1/2 cup carrots, sliced/cubed/etc (steam with the potatoes)
1/2 cup snow peas
3/4 cup broccoli, cut into florets 

Ingredients III - cashew cream - soak these together overnight/at least 3 hours
3/4 cup raw cashews
1 - 14oz can coconut milk


Method

In a small blender or food processor, puree all of Ingredients I

In a small pot, add in the butter from Ingredients II. Once the butter starts to sizzle, add in the paste you just made. Allow the flavours to come 'round for a few minutes, then add in your vegetables. 

Stir occasionally for 5 minutes while you make your coconut cream.

To make your coconut cream, throw the coconut milk + cashews in a blender until smooth and creamy. I used the same blender for my cashew cream, as I did to make the paste. Nothing to it but a quick rinse. Add coconut cream from Ingredients III to your pot, stir, and serve once the vegetables are thoroughly cooked through. 

Serve with rice, quinoa, couscous, etc. Top with some slivered almonds.


******

Find more recipes over at


******

Thursday, November 20, 2014

Time for Dessert-Flan from Cuba!


Cuba is a country of tradition, and Flan, aka Creme Caramel is one of those traditions. Every celebration meal ever made in my Cuban household has included Flan. I always made the simple classic, but it certainly can be modernized with coffee or pumpkin to suit your tastes. This is a timeless recipe I have made many, many times in a pressure cooker in a cut down coffee can (also traditional). If you dont want to work with a pressure cooker, you can use a  bain de Marie or a pan of water in the lower rack of the oven to keep it moist. This recipe version is taken from the Blog My Big Fat Cuban Family.  While we may differ politically, we all love the food. Apparently a family member is coming from Cuba in December, so I better start practicing again to make the Classic Dessert of every Cuban celebration. 

Friday, November 8, 2013

Foodie Friday : Cinnamon Zucchini Muffins

It's Foodie Friday! Check out Caitlin / realswanky's latest recipe for Cinnamon Zucchini Muffins 


Yields: 2 8x4 loaves, 4 mini loaves, or 2 dozen cupcakes

Ingredients I
3 tbsp ground flax + 1/4 cup warm water (set aside for 5 minutes, then add the rest of the ingredients listed in Ingredients I)
1 1/2 cups white sugar
2 tbsp white vinegar
1/2 cup oil
1/2 cup natural apple sauce

...Mix together until sugar has dissolved pretty alright. Then add in,
2 cups grated zucchini -- peeling optional -- I found one 5-6 inch/"Medium" zucchini to give me 1 cup, grated

Ingredients II
2 cups white flour
1 cup whole wheat flour
1 tsp baking soda
1/4 tsp baking powder
1 tsp salt
3 tsp cinnamon or pumpkin pie spice
...Whisk together to ensure evenly incorporated

Optional: a total of one cup of raisins, nuts, dried fruit, chocolate chips, etc.

Method
Preheat oven to 325F.
Add in one half of Ingredients II to Ingredients I. Stir evenly and ensure there's no massive flour lumps, then add in the second half, being mindful of an even consistency. 

If using any optional add-ins, stir them in now.

2 LOAVES: Line, "PAM", or grease-and-flour your loaf pans. Bake for 60-70 minutes.
4 MINI LOAVES: Line, "PAM", or grease-and-flour mini loaf pans. Bake for 40-45ish minutes.
24 Muffins (in a cupcake tin): So far, I've only used liners. They bake best in 25-28 minutes.

As always, use a toothpick to check for doneness.

These aren't glossy or oily on top, or throughout, so don't worry about these getting a beard overnight. Store in a cool dry spot. Split and eat with a slab of vegan butter, preserves, nut butter, that kind of thing.

Friday, November 1, 2013

Foodie Friday : roasted squash, kale & bean soup


Curious as to what WESTies are making outside the craft room? Let's step into Caitlin (Real Swanky)'s tiny, wood-paneled kitchen today..

As the weather slowly gets more and more lame, I'm taking a short hiatus from my usual overnight oats & cold Tofurkey sandwiches, and am utilizing that great big, stainless steel pot that's been in this dapper house long before I came along. I really wanted to make something with roasted vegetables and kale. Roasting a whole bulb of garlic with the squash is probably the best thing you'll do this week. Thanks to the roasted vegetables and garlic, there's a sweetness to this soup, so going easy on the salt shaker isn't a bad idea. You'll probably need a cute set of shakers anyhow, so I'd scoop up Lisa's Dachshund shakers, if I were you!

Serves 8

Ingredients I
2 butternut squash, cubed
1 small bag baby carrots (or 2 cups), chopped
1 large onion, chopped
1 head of garlic
Olive oil for drizzling
Salt and pepper to taste

Ingredients II
1 - 14oz can of diced tomatoes
10 cups of water or vegetable broth
1 bay leaf

Ingredients III
1 - 14oz can of white kidney beans, thoroughly rinsed
1 bunch kale, chopped into bite size pieces


Method

Place your chopped batch of Ingredients I on a baking sheet, and drizzle with olive oil and seasonings. Bake at 425F for 40 minutes, stirring about half way through.


Remove garlic from bulb. For more on roasting your own garlic, head here.


Toward the tail end of roasting, put all of Ingredients II -except the bay leaf- in a large pot, and blend with your handheld immersion blender*. Then, bring to a boil. Don't season this just yet - your roasted vegetables will add all sorts of flavour once added to your broth. Right, now add your bay leaf.
*Fun side note - it took me a few years of cooking to realize I can blend things on the stove in my cutoffs without getting burn marks permanent stories if I'd just blend things before turning on the stove.

Add your roasted vegetables to your new broth. Then, add in all of Ingredients III. Continue to boil for ten minutes, then let simmer for at least 15 minutes (or until your kale and beans are soft enough for you)

Now that your soup is done, give'r a taste a see if you'd need to add any seasonings! By now, the flavours have started blending nicely together. It's just up and up from here.


***
Digging these posts?
Caitlin blogs adaptable, vegan recipes
at TheHardcoreHerbivore.com
***