Showing posts with label adaptable recipes. Show all posts

Friday, March 4, 2016

Foodie Friday : Summer Squash Soup with Coconut Milk and Banana

Hi everyone! It's Foodie Friday and I'm back again this week to share another recipe that I whipped up intuitively. This time it's a soup and while I apologize for the absence of measurements to accompany each ingredient, this dish welcomes even more flavour flexibility, so you're able to fine tune it as you wish :)


Summer Squash Soup with Coconut Milk and Banana


Ingredients:
  • Summer squash
  • Bananas
  • Fresh or dried garlic and onion -- I used both
  • Water
  • Spices: coriander seed, red chili flakes, cardamom, ginger, cassia, turmeric, clove and nutmeg
  • Coconut milk (if desired)
  • Minced herbs for garnish (if desired) -- I used chives and shiso leaf

Method:
  1. Wash, peel, de-seed and chop/cube summer squash
  2. Sautée squash in a well heated pan with olive oil with a bit of dried onion until lightly golden on all sides. If you're making a lot of soup using a lot of squash, you may need to do this in multiple batches. In either case, when finished, set it aside. The purpose of sautéing in advance is to enhance the natural flavours of the ingredient before boiling it into soup. This step also helps the squash cook faster, so you can dig into the soup faster :)
  3. Using the same pan, sautée bananas into a mushy consistency, and put them aside as well.
  4. In a soup pot, brown finely diced onion and garlic until the scent increases, then add the squash and banana and stir everything together.
  5. Once stirred, add enough water to cover the contents of the pot.
  6. Add the spices mentioned above to taste, and don't be shy about the quantity. You might have noticed this recipe doesn't use soup stock, so all of your flavour will come from the ingredients you've added, including these spices.
  7. Allow the soup to boil briefly, then lower the heat to a simmer
  8. Taste the blend and add more spice if desired
  9. Allow the soup to simmer until the squash has soften enough to either transfer to a blender, or use an immersion mixer to purée everything to your desired consistency.
  10. Ladle the soup into bowls, heavily pour coconut milk so it creates an aesthetically pleasing swirl and top with fresh  fresh herbs for garnish. 

You will probably have left over coconut milk. If so, add it to the leftover soup still in the pot and stir -- tomorrow's soup will taste different without any work to create variety ;) Whooo! Who says leftovers are boring? *lol*

Enjoy!!


Post and Recipe by: Milena from Just the Goods 
Check out her Etsy shop HERE

Friday, February 5, 2016

Foodie Friday ft Peanut Curry

Foodie Friday with Caitlin of Real Swanky! Today in Caitlin's kitchen, we whip up a rich, peanutty massaman curry served with rice and garnished with peanuts. Vegan friendly, gluten-free friendly, and can be easily subbed with ingredients of your choosing to be mindful of likes/dislikes/allergens, etc. Enjoy!


A rich, nutty curry with a slight bit of heat to it. I served mine over rice with a peanut garnish. If you've ever stepped foot down the ethnic aisle at your grocer I'm sure you've seen Cock Brand canned and bottled goods. The little rooster logo isn't quick to miss, and the items are always very reasonably priced. Here are just a few familiar items. The curry pastes are my FAVOURITE and set me back a toonie at the best of times. They last ages and refuse to expire, really. I highly recommend 'em. On to the recipe.

*If serving with rice, get started on this now before prepping your curry.

Ingredients I
4 cardamom pods
1 tsp cumin seeds
1 tsp coriander seeds

Ingredients II
1/2 white onion
1/2 cup coconut cream
1 tbsp curry paste (I used this brand) or to taste
1 tbsp coconut oil
2 tsp lemon grass
2 tsp vegan fish sauce or Kikkoman soy sauce
1/2 tsp salt
1/2 tsp course black pepper

(Toast all of Ingredients I in a frying pan on medium for 3-5 minutes. Place in a coffee grinder/mortar and pestel until ground to a dust then place Ingredients II and grind to a paste.)

Ingredients III
1 can coconut milk
3/4 cup peanut butter

Place all Ingredients I, II, and III in a small pot and stick on medium high. Allow this to come to a boil for a few minutes, than simmer on low to thicken.

Bring to a boil 2 cups of vegetables. I used: potatoes, broccoli and onions. Boil until fairly tender with a slight bit of crunch. 

Place the vegetables in the simmering curry and stir well.

Serve with rice. Top with peanuts.

Find more rad recipes over at Caitlin's blog, The Hardcore Herbivore!

Friday, June 19, 2015

Foodie Friday : no bake coconut cookies with almond butter


No bake cookies that whip up in a hot minute. Recipe by Caitlin of Real Swanky! Coconut oil helps firm up the cookies as it returns to it's more-so solidified state in the fridge.

Ingredients I
1/4 cup coconut oil, loosely scooped
1/2 cup brown sugar
2 tbsp dairy free cream
2 tbsp carob or cocoa powder

Ingredients II
1/3 cup nut butter (I used almond)
1 1/4 cups rolled oats
3/4 cup unsweetened shredded coconut
Vanilla
Up to 1/3 cup add-ins (chopped nuts, chocolate chips, dried cherries etc)

In a sauce pan, heat the oil in Ingredients I. Once fully melted, add in the remaining ingredients.

Let boil for a little under a minute and remove from heat. Add in all of Ingredients II, and stir until well combined.


With an ice cream scooper, scoop onto parchment paper on a 9x13 pan.

Refrigerate for a few hours (however, firms up best overnight).


* * * * * * * * * *
Find more rad recipes over at Caitlin's blog,
* * * * * * * * * *

Friday, June 5, 2015

Foodie Friday : Smoky maple tofu "bacon"


Give those gustatory receptors a run for their money. Smoky, maple-kissed tofu baked in the oven. Super quick, easy, and adaptable as ever! Caitlin of Real Swanky shows you how below..

Preheat oven to 375F.

Marinade
1/4 cup water
3 tbsp (light) Kikkoman soy sauce
2 tbsp brown sugar, loosely packed
1 1/2 tbsp nutritional yeast flakes
1 heaping tbsp pure maple syrup
1/2 tsp liquid smoke ("hickory" flavour)
1/4 tsp cayenne pepper
1/4 tsp paprika
1/4 tsp pepper

Extra firm or pressed tofu - sliced into 1/4" thick pieces

1 tbsp coconut oil, melted (alternatively, canola oil or cooking spray)

Create your marinade. Allow tofu to soak up the flavour. I let mine marinade for ~1hr while I was out and about. Reserve the marinade!

Oil up your 9 x 12 baking pan.

Bake for a total of 15 minutes. Each 4-5 minute interval, flip your tofu, and spoon remaining marinade on top.

Transfer to a cooling rack with parchment paper on top.


I downed mine on an open face sandwich ft. buttered, toasted Canadian rye bread and coleslaw.

For the coleslaw
1/2 cup shredded cabbage
1 heaping tbsp vegan mayo
1 tsp dijon mustard
1/4 tsp celery salt
Pinch of: garlic powder, onion powder, pepper

See more over at Caitlin's blog,

Friday, April 24, 2015

Garden vegetable baked fusilli.


Step into the kitchen with Caitlin of Real Swanky! Today we work on a quick and easy baked pasta dish. Incredibly adaptable, quick and easy!


Ingredients I
2 cups dry fusilli
5 cloves garlic
Water, for boiling pasta
Pinch of salt

Ingredients II
1 small zucchini, sliced
1/2 red bell pepper, sliced
6 mushrooms, chopped
1/2 yellow onion, sliced
1 roma tomato, chopped
1/2 tsp basil
1/2 tsp oregano
1/4 tsp salt
1/4 tsp pepper 

Ingredients III
12oz (1 1/2 cups) crushed tomatoes
1/2 cup non dairy cheese - I used a blend of Daiya mozzarella and cheddar

Ingredients IV
2 tbsp butter, melted
1/2 cup panko
2 tbsp nutritional yeast

Optional: flat leaf parsley

Preheat oven to 415F.

Oil up the inside of your dish, which ought to be about 8x12".

In a pot, boil water with salt for your pasta. Once boiling, drop in your garlic and pasta. Bake for ~7 minutes, or until 3/4 way cooked through.

Saute all of Ingredients II while the pasta is boiling.

Once your pasta is al-dente, drain and place in the frying pan with Ingredients III

Stir together and pour into your baking dish.

Top with more cheese if you fancy.

Mix up Ingredients IV and dollop onto your dish. It'll look a little mushy at first, but it crisps up real dandy in the oven.

Bake for 30 minutes on the button, and let cool for 10 minutes or so before serving. Top with parsley if using.


See more recipes over at The Hardcore Herbivore!


Friday, January 16, 2015

Foodie Friday with Caitlin / Real Swanky : Vegan vegetable vindaloo

Happy Friday! Let's see what's cookin' in Caitlin / RealSwanky's kitchen today.


Vegan vegetable vindaloo with homemade curry paste. All spices picked up from Bulk Barn, which is easy on the wallet, no doubt.


Ingredients I - Vindaloo Paste
1 small onion, roughly chopped
3 cloves garlic
2 tsp ginger
1 tbsp hot pepper paste*
3/4 tsp ground cumin
3/4 tsp ground turmeric
3/4 tsp ground coriander
1/2 tsp dry mustard poweder
1/2 tsp whole mustard seeds
1/2 tsp whole fenugreek seeds
1/2 tsp white peppercorns**
1/4 tsp, salt (scrap if your pepper paste already has a heap of salt added)
1 tbsp loosely packed brown sugar
1 small dash of cinnamon 
Reserved 1/3 cup water

Ingredients II - Fresh produce
5 baby Indian eggplants, quartered
1 carrot, chopped into medallions
1 smal roma tomato, chopped
~10 green beans, roughly chopped
1 tbsp vegan butter

Don't Forget --
Rice, quinoa, couscous, etc to serve alongside your curry


* The hot pepper paste I used, was picked up at Sun Wah, an oriental grocery shop in The Exchange District, Winnipeg. This recipe calls for 1 tbsp and I find it's pretty crucial. A tub of this will set you back about two bucks. Be mindful, each brand yields a different flavour, pick a tub with minimal ingredients. I used:


** White peppercorns can be found at your local bulk store. You don't need heaps, and they're cheap as sin. 1/4 cup of these cost about $0.30 :


First off, get some rice/quinoa/couscous started.

Next, melt the butter in a pan. Add in your fresh produce, and place a lid on top. While that's cooking, make up your paste.

To make the paste, I used a Magic Bullet. Place all ingredients inside and add half of your reserved water. Blend until smooth, scraping down the sides after pulsing. Add the remainder of the water, if needed.

The vegetables take about 10-12 minutes to cook through. Once they're done, pour in your curry paste, mix thoroughly, and serve alongside your grain of choice.


Find more of Caitlin's recipes on WWW.THEHARDCOREHERBIVORE.COM !


Friday, January 9, 2015

Foodie Friday : Vegan friendly mushroom cranberry seitan roast


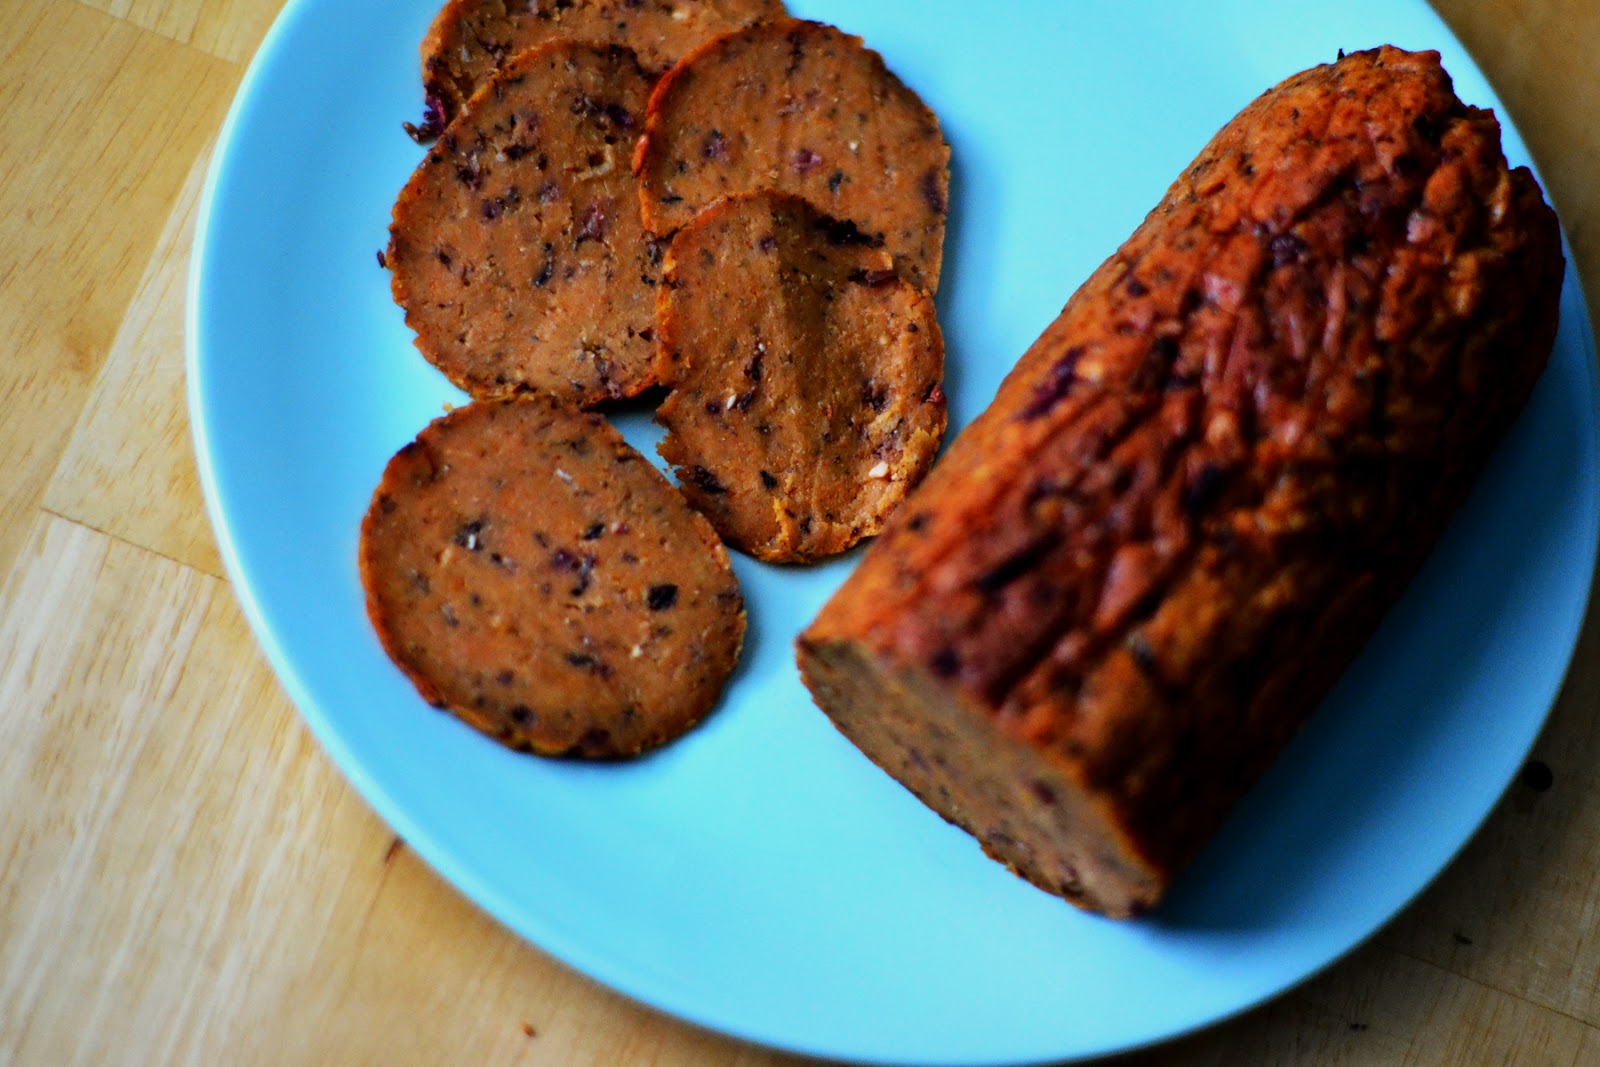
Welcome to Foodie Friday! Caitlin of Real Swanky / The Hardcore Herbivore is at it again, this time with her vegan-friendly roast! Flecked with pulsed cranberries and mushrooms, this roast mimics the Field Roast apple-sage breakfast links we can no longer get in Canada


The base of this recipe is vital wheat gluten. It's also referred to as wheat gluten, gluten flour, or vital wheat flour. Bob's Red Mill explains it best, "[...]Vital Wheat Gluten is made from the protein found in the endosperm of the wheat berry, containing 75% to 80% protein. When combined with water it becomes highly elastic and has a taffy-like texture". This is the base of a HEAP of your favourite vegan chinese dishes that contain vegan friendly meats. 

..What are we looking at cost-wise, though?

  • Bob's Red Mill - 632g at Sobey's = $8.99CDN / $1.44CDN per 100g 
  • In Bulk - per 100g at Bulk Barn = $1.20CDN per 100g (being extremely mindful of their $3 of a $10 purchase coupon quite often in full effect.. student and senior's day too) 

Because this recipe calls for about 1 1/2 cups, you're looking at about $2. Plus the cost of spices, which isn't heaps. $2 for over a week's worth of protein? Not bad!.. Besides, aren't we paying, like, $3.50 for 8 thin slices of this stuff?

I found this roast, straight out of the oven, to be really spongy and chewy (in a good, sausage-y way), but once I let it set in the fridge overnight, it firmed up and shaved wonderfully. I have MORE than enough to sauté for breakfast sandwiches, or dice up for pizza and kolaches.

Ingredients I
1 1/2 cups vital wheat gluten
1/3 cup nutritional yeast
1 1/2 tsp salt
2 tsp paprika
2 tsp freshly ground pepper
1 tsp cayenne pepper
1 tsp dried oregano
1/2 tsp mustard powder


Ingredients II
3/4 cup cold vegetable stock or 3/4 cup cold water + 2 tsp powdered vegetable broth
4 tsp tomato paste
2 tsp oil
1 tsp minced garlic
1 tsp chopped basil

Ingredients III - Pulse into very small bits and set aside
5 mushrooms
1/2 an onion, equaling about 1/3 cup
5 tbsp fresh cranberries

Heat your oven to 325F. Get a cookie sheet ready with two pieces of tin foil, stacked on top of each other, that are about the size of your cookie sheet (which ought to be at least 9x9")

In a large bowl, whisk together Ingredients I. In a small bowl, whisk together Ingredients II then immediately stir in Ingredients III. Incorporate your wet mixture, into your dry mixture. Begin by mixing in with a fork, then work with your hands until a moist, slightly sticky dough forms. If you need a bit more vital wheat gluten at this point, add a teaspoon over top your dough ball. Knead for at least 3 minutes to activate the gluten.

Transfer your dough to your tin foil. Shape into a log that's about 8 inches/20cm long. Roll up like a Tootsie Roll and twist the edges, being mindful not to wrap too tightly, as the roast will expand a little upon baking.

Bake for a total of 90 minutes, flipping the roast to a new side after each 30 minute interval.


I sliced my roast up the following morning and immediately made the saddest sandwich of everyone's youth: meat, earth balance, vegan mayo and bright yella mustard. I can't fake sick and watch Price is Right this morning, but that's only because it's Sunday.


Find more recipes over at

Friday, January 2, 2015

Foodie Friday : Vegan vegetable korma

Happy days, everyone! Has anyone made any New Years resolutions? Let's visit with Caitlin / Real Swanky and see what she's up to in the kitchen!


It's the second day into January and already I've been wanting to cook (lots more) and master a few dishes. I'm happy to report this is a solid recipe for vegetable korma that actually tastes like vegetable korma. No dairy here, just coconut-cashew cream. Serve alongside basmati rice, top with slivered almonds. This recipe serves 6-8 and I'll be making heaps more poste-haste.

Ingredients I - curry paste 
1 tsp ground cumin
1 tsp ground coriander
1 tsp ground turmeric
1 tsp salt
1-2 tsp coarsely ground pepper
2 tsp masala
2 tsp white sugar
1 tbsp grated ginger
2 garlic cloves or 2 tsp minced garlic from the jar
2 tbsp tomato paste
2 tbsp canola oil
1 green chili, seeds taken out
1/4 cup shredded, unsweetened coconut
1/4 cup water

Ingredients II
2 tsp vegan butter
1 onion, diced - about 3/4 cup
1 red pepper, julienned
1 white potato, cubed into 1/2" pieces (steam beforehand to save you some time later on) 
1/2 cup carrots, sliced/cubed/etc (steam with the potatoes)
1/2 cup snow peas
3/4 cup broccoli, cut into florets 

Ingredients III - cashew cream - soak these together overnight/at least 3 hours
3/4 cup raw cashews
1 - 14oz can coconut milk


Method

In a small blender or food processor, puree all of Ingredients I

In a small pot, add in the butter from Ingredients II. Once the butter starts to sizzle, add in the paste you just made. Allow the flavours to come 'round for a few minutes, then add in your vegetables. 

Stir occasionally for 5 minutes while you make your coconut cream.

To make your coconut cream, throw the coconut milk + cashews in a blender until smooth and creamy. I used the same blender for my cashew cream, as I did to make the paste. Nothing to it but a quick rinse. Add coconut cream from Ingredients III to your pot, stir, and serve once the vegetables are thoroughly cooked through. 

Serve with rice, quinoa, couscous, etc. Top with some slivered almonds.


******

Find more recipes over at


******

Friday, March 28, 2014

Foodie Friday : Lemony linzer cookies.


Caitlin here, from Real Swanky / The Hardcore Herbivore. Lemon Linzer cookies were a part of my childhood. I spent a good while veganizing this recipe from Bake..With Anna Olsen and am happy to report they turned out stellar. Plus, what better way to utilize my lovely new CuisinArt mixer? 

Believe it or not, the Rudimentary Peni & Suicidal Tendencies stickers
did NOT come with the mixer. We live in a harsh world.

A word on sugar, powdered and otherwise. I refer to veganproducts.org for cruelty-free brands. VivaLaVegan also has this super helpful bit of info!

Ingredients I

3/4 cup white flour
1 1/4 cups almond flour (almond meal)
1/4 cup powdered sugar
1/2 cup vegan butter, cubed and chilled -- I used Earth Balance

Ingredients II
2 tbsp agave nectar
2 tbsp cold water
1 1/2 tsp egg replacer -- I used Ener-G
Zest of 1 lemon
Almond extract
Vanilla

Ingredients III
~1 cup filling -- I have half a cup each of lemon curd and blueberry pie filling
Powdered sugar for dusting

In a large bowl, mix together dry ingredients in Ingredients I. Add in your butter. Beat with an electric mixer or your mixer. The mixture will be dry and crumbly.

In a small bowl, combine all of Ingredients II. Lightly whisk until well-combined. Pour into your large bowl and mix until just combined.


Your dough will be soft and quite pliable.


Too pliable. So, we ought to chill it.

Remove from bowl and form into a disc shape on cling wrap.


Chill the dough for at least one hour in the fridge. Once that hour is up, preheat your oven to 350F. Line two light-coloured baking sheets with parchment paper.

Halve your dough. Dust some flour on your surface and on your rolling pin. Roll out your chilled dough to be about 1/4 inch // 6.35mm  thick. Using a cookie/biscuit cutter, cut out 12. Repeat with your other half. Using a smaller cookie cutter, cut out the centres. I used circles, and scored these little darlins from the Dollar store in town. You'll now have 12 bottoms and 12 tops. I had some extra dough left, so I made 1-inch scalloped circles to make a few mini-sandwiched cookies.


Bake your full cookies for 5-6 minutes or until edges are lightly browned. Bake your holey cookies for 4-5 minutes, same deal. Cookies with hard edges or holes will brown faster.


Once baked, keep them on the cookie sheet for 3-4 minutes, then transfer to a cooling rack.

Dust powdered sugar on the holey cookies - make sure they're fully cooled er you're in trouble.


Take the flat side of the full-cookies and spread a light layer of your filling on it with a small offset spatula or butterknife, about 1/8 inch away from the edges. Add an extra dollop to the centre. Press your cookie toppers on.

Friday, March 21, 2014

Foodie Friday : Cranberry coconut bran muffins with fresh ginger.


Caitlin (realswanky & thehardcoreherbivore) here with a recipe for cranberry-coconut bran muffins with fresh ginger. Bran muffins are super hit or miss. These are the hit-type. I've pulsed fresh cranberries, grated some ginger and threw in some unsweetened coconut so as to make these muffins good things. Throw in some more ginger, nuts or carob chips, whatever's your bag.

Yields 16

Ingredients I
1 1/2 cups bran
1 3/4 cups almond milk

Ingredients II
1/2 cup oil
2 tbsp molasses
Vanilla

Ingredients III
1 cup white flour
1 cup whole wheat pastry flour
1/2 brown sugar
1/2 cup white sugar
1/2 tsp salt
1 tsp baking soda

Ingredients IV
1/2 cup unsweetened coconut
3-inch chunk of ginger, peeled and grated
1/2 cup fresh, raw cranberries, pulsed

Preheat oven to 375F.

Combine Ingredients I in a bowl and let sit for 10+ minutes. This is to soften the bran. Add Ingredients II into this bowl. In a seperate bowl, combine Ingredients III. Lastly, stir in Ingredients IV. Your batter ought to look like this:


Using a 1/4-cup ice cream scoop, fill your liners. They'll be about 3/4 full, but will rise above quite a bit when baking.

Bake for 20-22 minutes, or until a fork comes out clean from the centre.


Split open and spread on some nut butter, fruit preserve, vegan butter, or enjoy on their own.

Friday, November 29, 2013

Foodie Friday : vegan fruitcake

A quick write-up by Caitlin/realswanky on vegan-straightedge holiday baking. It can be done!

Being vegan around the holidays has certainly gotten easier over the years, though I certainly missed my grandmother's fruitcake. All 20 pounds of that wee loaf was something to write home about. Because I don't drink, I had to come up with a spiced something to soak my fruit and nut mix in. I went with pineapple juice and a big chunk of ginger. It softens the mix and adds a badass kick to everything.

This is a 4-part recipe, which may seem a little terrifying - but in actuality, it's easy peasy, lemon squeezy.


Ingredients I
3/4 cup pineapple juice
1 1-inch chunk of fresh ginger, peeled

Ingredients II

1/2 cup Medjool dates, chopped
1/2 cup glace cherries, chopped
1/2 cup Calimyrna figs, chopped
1/2 cup dried apricots, chopped
1/2 cup dried candied citrus peel, chopped
1 cup nuts -- I used pecans, walnuts, and slivered almonds

Ingredients III

2 tbsp maple syrup or agave
1 cup almond milk
Vanilla -- I used 1 tbsp vanilla paste

Ingredients IV

2 1/4 cups white flour
2 1/2 tbsp. baking powder
2 "eggs" -- I used No Egg*
3/4 cup white sugar
1/4 tsp salt

Preheat your oven to 325°F. Grease up a large bundt pan, 8x mini loaf pan, 1x 9" springform, or 2x 5" loaf pans.


Combine Ingredients I and let sit for 15+ minutes. In a large bowl, mix together all of Ingredients II and pour 1/2 cup of your pineapple-ginger mix in. Cover and let sit for an hour. This'll soften up everything and get it tasting real nice. Give it a mix half an hour in. 


In a small bowl, mix together your Ingredients III and set aside.


In the same massive fruit-and-nut bowl, begin sifting your Ingredients IV over top, and give it a good mix. Everything should be coated nicely in the dry mix. If you're wondering why this is a thing, it's so that your fruit/nuts won't stick together and fall to the bottom whilst baking.


*If you're using an egg alt that isn't a dry mix, or requires liquid, shove the liquids in your Ingredients III bowl.


Finally, pour Ingredients III over everything and give it a good mix. Your batter's to be thick, and well mixed.


Place batter in your pan(s). A bit over 3/4 full will do. For smaller loaves, 30 minutes will do. Larger pans will take a bit longer. Do the toothpick test! Your toothpick will come out dry, and the tops will be lightly browned.


Once fresh out the oven, brush your cake tops with your remaining pineapple juice. Let sit in the pans for another 15 minutes, brush again, and let sit 'til cool. Pop'um out, and wrap them up so they don't get gross. 


A few days in these will taste best, but it's perfectly well and fine to dig in early.


Find more recipes like this at
TheHardcoreHerbivore.com!