Showing posts with label diy. Show all posts

Friday, September 9, 2016

Foodie Friday : Vegan Leek and Potato Soup

Quick Vegan Leek and Potato Soup for Busy People


Directions:
- Peel and chop a few potatoes + slice a medium sized leek
- Place in covered bowl and microwave for 5 minutes- Pour into blender; cover with a non-dairy milk of your choice (I like almond milk); add fresh or dried thyme, salt, and a pinch of nutmeg to taste
- Blend until smooth (approx 1 minute, depending on your blender)
- Dish, garnish and serve! In this image, I've topped the soup with more dried thyme and a sprinkling of coconut bacon

VoilĂ ! Fresh, home made soup in 7 minutes or less, no joke Enjoy!


Recipe by Milena of Just the Goods

Monday, February 29, 2016

The W.E.S.T. members had a Make night!

Our annual Winnipeg Etsy Street Team Spring Craft Market is coming soon! In preparation we designed lots of cool re-usable fabric bags to give away as swag to some lucky amazing shoppers at the sale


We made 75 bags that evening and had lots of fun connecting with the other WESTies. Here are some of the cute bags we made!


Be sure to add our upcoming Sale to your Calendar!


Check out the Facebook Event HERE


Monday, February 1, 2016

GIVEAWAY and Tutorial! : Valentine's Day handwarmers

WESTie Deanne from Annie and Dot Fabrics has an exrta-neat Valentine's Day tutorial just for you! Read below to see how to make your very own heart shaped handwarmers. Want to win your own pair of handwarmers? Read to the very bottom to find out!


Hi there! I’m Deanne from Annie and Dot Fabrics and I wanted to share a little fun LOVE-ly craft that anyone can make. My boys spend alot of time outside and often come in with chilly feet and hands and handwarmers are such a great thing to give them so that they can warm up in a jiff. You can toss these little guys in their pockets or in their gloves as they make their way to school. Or in their boots after they get off the ice as we often do with our boys. 

Since February hosts Valentine's Day I thought it would be extra special to give our diy a love theme. You can make and give to loved ones or just keep for yourself around the house. This is such a quick and easy diy that you can even involve your kids. I know my oldest liked cutting out my patterns and putting the different hearts together, while my youngest helped me funnel the rice in. 

On top of these being great for warming hands they can also be really good for cooling too. Make a few extra and toss them in the freezer for when you need a little cooling action. They are perfect for kids as they don’t get as cold as an ice pack and are more engaging so chances are they might leave the cold pack on longer. This craft can also be turned into many other things, such as closet or herbal satchets to use around your home, decorations, beanbags and probably lots more, but today I am going to show you how to make heart handwarmers.


This project can be done with or without a sewing machine. I stitched mine on my machine but you can handstitch your hearts for that added love.


What you’ll need:
fat quarters, charms, scraps of 100% cotton *shameful plug: check out www.annieanddotfabrics.etsy.com for some fun fabric options.*
thread
rice
pattern
other sewing notions-needles, pins, pinking shears


Directions:
1. Print out the pattern and cut out your hearts how you see fit. You can cut your heart fabric pieces out using pinking shears to cut back on the fraying and to give a fun finish or leave as is and they will fray over time.
2. Place small heart on one big heart and stitch down with ¼” seam. You can pin your small heart to your big one or in my case I use a glue stick and tack the middle down--just don’t put too much near the outside edge as you don’t want to gum up your needle.
3. Place 2 big hearts wrong sides together and start on one of the straight edges to stitch ¼” around, leaving a 1”-2” opening. You can use a zig-zag stitch or a shorter stitch length. Make sure to backstitch at starting and finishing points.
4. Fill your heart up half to three-quarters full with rice.
5. Close up opening with a little gluestick or pins and stitch your opening closed either by hand or machine. Remember to make sure the rice doesn’t get close to your needle or you may break the needle.
6. Heat up in your microwave for 20-30 seconds for warm results or store in your freezer for a cooling option.

**Make sure your handwarmers aren’t too hot before handing to little ones. And ALWAYS adult supervision is advised at all times.**


So for those of you who aren’t that much of a DIY-er, just don’t have time, a sewing machine or whatever, feel free to comment below for a chance to win your set of heart handwarmers. To enter, simply comment about who you will be celebrating Valentine's Day with - it’s that easy! Winner will be notified by email.  Want another chance to win? Comment on the IG post as seen today on WEST's Instagram AND our WEST Facebook page!


Contest opens right now - and closes on Thursday, February 4, 2016 at 11:59pm Central Time. The extra-lucky winner will be chosen at random and WEST will post such on Saturday, February 6, 2016 at 3:00pm Central Time! Best of luck! 


Thanks so much for stopping by! Feel free to post pics of your finished handwarmers. Or if you turned your heart handwarmers into something else let us know - we would love to hear your ideas. :)

Friday, October 16, 2015

Foodie Friday : sesame 'chicken' with lo mein noodles


Caitlin from Real Swanky here, sharing my latest favourite recipe: sesame chick'n with pan fried lo mein noodles. This recipe is quick, easy, adaptable and easy on the change purse! With lo mein noodles setting you back approximately $1.50 (to serve 4-6) and Soya Slices at $1.19 (to serve 6-8), breathe easy knowing you can feed an army on a budget no worries. :) 

Eerily similar to sesame "chicken" at vegan friendly Chinese restaurants. Which are, oddly, freakishly similar to sesame actually-chicken at non-vegan friendly spots in town. Whip this recipe up in 

I picked up my soya slices at Dino's Grocery in Winnipeg's West End. I like Luxmi brand soya slices. Alternatively, check out Bulk Barn for their "So Soya Slices" in Bulk near the TVP and quinoa. One "Bulk Barn"-sized scoop costs approximately $1.25, the slices typically double in thickness after soaking.


Ingredients for Soya Slices
3/4 cup dehydrated soy slices*
2 cups hot water
1 tsp salt
1 tsp pepper
1 tsp garlic, minced
-- Oil, for frying
-- Cornstarch, for frying
-- Sesame seeds, to garnish

Ingredients for Sesame Sauce
2 cloves garlic, minced / 1 tsp jarred garlic
1 inch fresh ginger / 1 tsp jarred ginger
1/2 onion, chopped
1/4 cup rice vinegar
2 tbsp Kikkoman soy sauce
2 tbsp brown sugar
1/4 cup orange juice**
2 tbsp agave
1 tsp Sriracha
1 tsp sesame oil
-- 1 tbsp corn starch + 1/4 cup water, mixed in a cup, kept aside

Ingredients for Lo Mein
Lo Mein noodles
Water for boiling
1-2 tbsp sesame oil
-- Sesame seeds, to garnish


Method for Soya Slices
Soya slices need marinating in hot water to bring them to a chewy, textured, hearty consistency. Bring a kettle of water to a boil. Pour 2 cups of this hot water in a large bowl and add remaining ingredients, all but the ingredients beginning with two dashes. Place a plate on top and let sit for 15 minutes. When 15 minutes is up, it ought to look like this:


Method for Lo Mein
Bring a pot of water to a boil, place your lo mein noodles in. Turn down to a simmer and cook about 4-5 minutes. Drain, then drizzle with sesame oil. In a large pan, fry up noodles on medium high. Stir and break up noodles as they start to brown and crisp up in the pan.

Frying the Soya Slices
In a large pan, pour enough oil in to lightly cover the base of the pan - about 4 tbsp.
Squeeze out the soy slices without breaking them. Coat lightly in cornstarch.
Fry in 1-2 batches (fresh oil for a second batch) for 5-6 minutes, turning as each side turns golden brown and crispy.


Method for Sesame Sauce
Place all ingredients minus cornstarch + water in a pot and bring to a simmer. Once bubbling, add in cornstarch + water mixture. Whisk until thickened and glossy.
**Alternatively, sub the OJ and sweeteners for apricot jelly!

Toss soya slices in sauce, being mindful not to stir in too much sauce.

Top with sesame seeds and serve alongside lo mein.


Sub the soya slices out for any protein of your choosing - just be sure to make up this awesome sesame sauce that keeps for up to a week in the fridge! (Not that you'll have leftovers ;)!)


Find more rad recipes over at


Tuesday, September 15, 2015

DIY Tutorial Time: Using Flowers from your Garden to Soften your Skin

Tutorial by Nancy of Nancy Blokland Pottery

I planted Calendula once, and now they are a permanent part of the garden. With their sunny yellow faces I am good with this. Here is a recipe to use this abundant "come-back-again-and-again" flower. It is edible too. I can share other recipes for that on another day.


GOLDEN CALENDULA LOTION OR CREAM

You will first need to make up a calendula infused oil. I do this each season when the calendulas are flowering in the garden. They self seed so you won't have to plant them each year and they are so useful. To do this, pick fresh calendula petals, as much as possible, (NOT MARIGOLDS) preferably straight from the garden. Place in a pyrex bowl & cover halfway with olive oil. Boil this mixture until the oil has made the petals crisp like chips. It works fine on the stove, using a stainless steel saucepan, but takes longer than a microwave. When cool, place in a sterilized glass screw top glass jar. It will keep unrefrigerated for ages!


Step 1


· 3/4 cup purified water or rosewater or other floral water, e.g. lavender, chamomile, orangeflower (also called hydrosols)


· 2 teaspoons glycerin 

Heat water or floral water to 60°C, then add glycerin, stir thoroughly & heat again to 70°C. (I don't measure the temp, I just go by feel, the temp is not critical).


 Step 2


· 16g emulsifying wax for a lotion or 30g for a cream


· 2 tablespoons of calendula infused oil (see above for directions)


Heat the oils to 70°C, then pour the hot water in a slow stream onto the oil, stirring constantly. Continue stirring until the temp drops to 45°C when you add the next step.


Step 3


· 20 drops carrot essential oil


· 15 drops essential oil according to skin type, can be a mixture of ones you like & are suitable (see above).


Add the essential oils & mix thoroughly. If the cream is too thick, add a trickle of floral water, beating & adding until you get the consistency you like. Pot into sterilized glass jars. Voila!!!

Tuesday, July 28, 2015

Tutorial Tuesday - Super Easy Clothespin Bag

Summer...my favourite time of the year. It's a time for beaches, ice cream and hanging laundry outside. There is nothing better (as far as laundry goes) than the fresh natural scent of line dried linens!

One thing that comes in very handy when hanging clothes on the line is a clothespin bag.  This is a super quick (and cheap!) way to make one. Quick, cute and easy, what more could you ask for?

Materials:

1 pair of infant overalls (bought for $2 at a local thrift shop)
1 hanger, preferably children's size (also purchased at thrift shop)


Method:

Basically this is a 2 step process. Cut and sew...that it!

Cut the overalls just at the crotch to make a straight bottom.


Turn the overalls inside out and sew a straight line 1/4" or so from the bottom edge. Finish edge with a serger, or if you do not have a serger, a simple zigzag stitch will do just fine.


Turn right side out once again and hang on your hanger.


That it! Your done! Now go do some laundry with your new clothespin bag!


This post is written by Andrea Davis and originally appeared on www.weareboundtogether.com

Thursday, April 17, 2014

Tutorial - Eggshell Candles Part 2

Last time I demonstrated how to make candles in eggshell halves. Today we're going to take a crack at making a candle using the whole egg. If you need a refresher on the materials needed, you can view that here.

Eggshell Candles # 2


We are going to use the whole shell of the egg for this. However we don't want the insides. With a pin, carefully poke holes in the top and bottom of the egg, enlarging the holes to about 1/4" wide.


Over a dish, blow into the egg. At first you will need to use a bit of force, but when the egg white/yoke starts flowing it will be much easier. Save the insides for future baking.


Rinse the egg shell well, and let dry completely. Cut wick to size, leaving lots of extra length. It is easier to trim the wick later than to work with wicks that are slightly too short. Prepare the wick like we did last time in Part 1, dipping the wick into the melted wax, cooling for a couple seconds, then pulling straight. Insert the wick into the eggshell: having a slightly stiff, straight wick make this a lot easier.


Cover the "pointy" end, or the side you want to be facing up, with your putty. Be careful not to break the egg shell; it is hollow now and much more fragile. It helps to roll the putty a bit to warm it up and easier to work with that way.


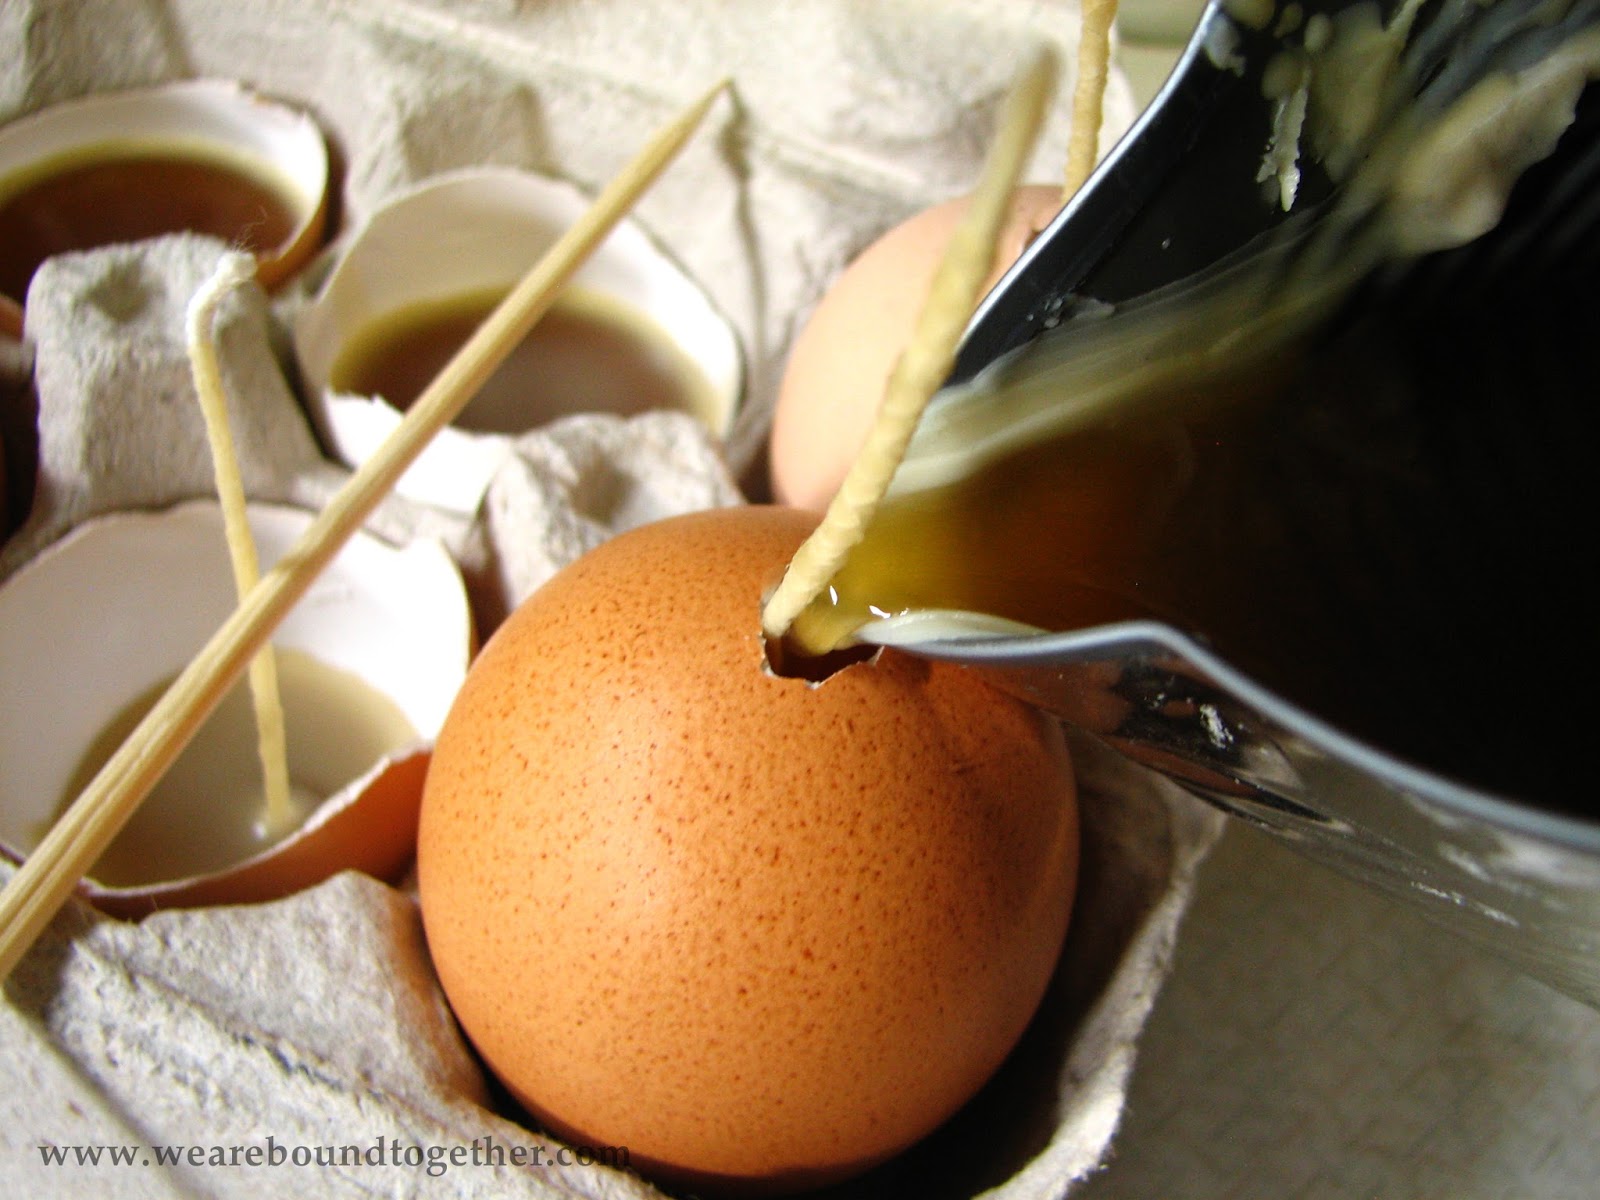
Place the egg, putty side down in your egg carton and fill with wax. You will want to make sure to fill the egg all in one go, not letting it cool in layers, or you will get ridges or lines in your final candle. Eggs hold a surprising amount of wax, but pour slowly because once it reaches the top it can make quite a mess.


Let cool completely. The egg itself will feel warm for quite a few hours afterwards. It is best to wait overnight to make sure all of the wax is hard. Once fully cooled, gently peel back the shell of the egg to reveal your candle.


If desired, you can flatten the bottom by trimming or rubbing on a hot pan, to allow it to stand on its own. Or you can display in eggcups. Be sure to trim wicks before lighting.


This post is written by Andrea Davis and originally appeared on www.weareboundtogether.com

Tuesday, April 15, 2014

Tutorial - Eggshell Candles Part 1

Easter is coming and here is a neat way to decorate with eggshell candles! There are a few different ways to make candles with eggshells. Today I will introduce you the first of different methods and types of eggshell candles.


Materials for parts 1 and 2: 
Whole eggs
Eggshell halves
Egg carton
Cotton wick
Wick tab (optional)
Sticky Tack or similar type putty
Tin can
Beeswax
Scissors

Take a clean tin can to use as a container to melt the wax in. Tin cans are great because you don't have to worry about cleaning the wax off the can when you are finished. Tin cans are also handy to use for pouring the wax as you can easily dent a spout for less mess.


Melt the wax in your tin can. You want to be careful when melting wax; it is important not to let it heat up too much. A safe way to melt wax is in a double boiler. By placing my wax tin in an old pot of water, I can easily and cheaply mimic a double boiler.

Egg Shell Candle #1

Save eggshell halves when using eggs. Wash the shells and let dry. Place the eggshell halves in the egg carton while you prepare your wicks. Cut wicks the approximate length you would need for each eggshell, but be generous. Over-estimate the amount you will need. Wicks will be trimmed when finished. If you don't have the metal wick tabs, that's okay! I will show you two different methods of how to place your wick.


 Dip the wicks into your melted wax. Let the wax cool for a couple seconds, then pull straight.


If you are using the wick tabs, place the wick with it's tab in the eggshell and cover with a bit of the melted wax. You may need to support the wick with a stick as the warm wax will soften the wax on the wick.


If you do not wish to use the wick tabs, simply fill the eggshell 3/4 of your final wax height and let cool until the top starts to harden.


Once the top is hardened a bit, take your waxed wick and poke it into the center. The wax underneath will still be liquid. The wick should be able to stand up in the wax.


Fill the eggshells the rest of the way using sticks as a support if the wicks start to droop.


Set aside and let cool completely. After several hours, when the wax is fully solidified, you may trim your wick down to about 1/4". Tune in next time when I show you how to make another type of eggshell candle in Part 2!

This post is written by Andrea Davis and originally appeared on www.weareboundtogether.com

Friday, March 28, 2014

Foodie Friday : Lemony linzer cookies.


Caitlin here, from Real Swanky / The Hardcore Herbivore. Lemon Linzer cookies were a part of my childhood. I spent a good while veganizing this recipe from Bake..With Anna Olsen and am happy to report they turned out stellar. Plus, what better way to utilize my lovely new CuisinArt mixer? 

Believe it or not, the Rudimentary Peni & Suicidal Tendencies stickers
did NOT come with the mixer. We live in a harsh world.

A word on sugar, powdered and otherwise. I refer to veganproducts.org for cruelty-free brands. VivaLaVegan also has this super helpful bit of info!

Ingredients I

3/4 cup white flour
1 1/4 cups almond flour (almond meal)
1/4 cup powdered sugar
1/2 cup vegan butter, cubed and chilled -- I used Earth Balance

Ingredients II
2 tbsp agave nectar
2 tbsp cold water
1 1/2 tsp egg replacer -- I used Ener-G
Zest of 1 lemon
Almond extract
Vanilla

Ingredients III
~1 cup filling -- I have half a cup each of lemon curd and blueberry pie filling
Powdered sugar for dusting

In a large bowl, mix together dry ingredients in Ingredients I. Add in your butter. Beat with an electric mixer or your mixer. The mixture will be dry and crumbly.

In a small bowl, combine all of Ingredients II. Lightly whisk until well-combined. Pour into your large bowl and mix until just combined.


Your dough will be soft and quite pliable.


Too pliable. So, we ought to chill it.

Remove from bowl and form into a disc shape on cling wrap.


Chill the dough for at least one hour in the fridge. Once that hour is up, preheat your oven to 350F. Line two light-coloured baking sheets with parchment paper.

Halve your dough. Dust some flour on your surface and on your rolling pin. Roll out your chilled dough to be about 1/4 inch // 6.35mm  thick. Using a cookie/biscuit cutter, cut out 12. Repeat with your other half. Using a smaller cookie cutter, cut out the centres. I used circles, and scored these little darlins from the Dollar store in town. You'll now have 12 bottoms and 12 tops. I had some extra dough left, so I made 1-inch scalloped circles to make a few mini-sandwiched cookies.


Bake your full cookies for 5-6 minutes or until edges are lightly browned. Bake your holey cookies for 4-5 minutes, same deal. Cookies with hard edges or holes will brown faster.


Once baked, keep them on the cookie sheet for 3-4 minutes, then transfer to a cooling rack.

Dust powdered sugar on the holey cookies - make sure they're fully cooled er you're in trouble.


Take the flat side of the full-cookies and spread a light layer of your filling on it with a small offset spatula or butterknife, about 1/8 inch away from the edges. Add an extra dollop to the centre. Press your cookie toppers on.

Friday, March 21, 2014

Foodie Friday : Cranberry coconut bran muffins with fresh ginger.


Caitlin (realswanky & thehardcoreherbivore) here with a recipe for cranberry-coconut bran muffins with fresh ginger. Bran muffins are super hit or miss. These are the hit-type. I've pulsed fresh cranberries, grated some ginger and threw in some unsweetened coconut so as to make these muffins good things. Throw in some more ginger, nuts or carob chips, whatever's your bag.

Yields 16

Ingredients I
1 1/2 cups bran
1 3/4 cups almond milk

Ingredients II
1/2 cup oil
2 tbsp molasses
Vanilla

Ingredients III
1 cup white flour
1 cup whole wheat pastry flour
1/2 brown sugar
1/2 cup white sugar
1/2 tsp salt
1 tsp baking soda

Ingredients IV
1/2 cup unsweetened coconut
3-inch chunk of ginger, peeled and grated
1/2 cup fresh, raw cranberries, pulsed

Preheat oven to 375F.

Combine Ingredients I in a bowl and let sit for 10+ minutes. This is to soften the bran. Add Ingredients II into this bowl. In a seperate bowl, combine Ingredients III. Lastly, stir in Ingredients IV. Your batter ought to look like this:


Using a 1/4-cup ice cream scoop, fill your liners. They'll be about 3/4 full, but will rise above quite a bit when baking.

Bake for 20-22 minutes, or until a fork comes out clean from the centre.


Split open and spread on some nut butter, fruit preserve, vegan butter, or enjoy on their own.

Tuesday, March 4, 2014

DIY Coffee Table Make-over, brighten your wood furniture with paint


I've had this solid wood coffee table since my first apartment, many years ago. It's been through a number of moves, and a long period in storage. I thought it was time to make it fresh again. I love the contrast of natural wood and bright white! Isn't it amazing what a little white paint can do?

What you'll need:
  • A piece of wood furniture you already have and want to refresh - or you could thrift something in need of some love
  • Painter's Tape
  • Sand paper
  • Krylon White Spray Paint (preferably with primer mixed in)
  • Clear Acrylic Laquer (also spray) 
The first thing you'll need to do is decide on the pattern or design you want for your piece. You can see (in the before) that the top of this table has a herringbone type pattern. I initially thought about making a chevron pattern on the top by taping off every other slat in the herringbone, then thought about diagonal stripes and finally decided on this square key design. 

Once you've got your work area set-up, you'll want to lightly sand the surface you'll be painting. I used 300 grit sandpaper and made sure that I sanded the entire surface I intended to paint. Make sure to vacuum away all the dust or use a tack cloth to clean off the surface before you start taping. 


Lay out your pattern with painter's tape, and be sure to cover the rest of the piece so you don't unintentionally paint other areas. I used a ruler to make sure my tape was laid out evenly and then taped some flyers around the edges to protect them and the table legs. 


Make sure that your surface is dust free and then spray away, applying thin and even coats. The toughest part of this project is the drying time. You have to be patient and make sure to allow enough time between coats for each layer to dry completely. I did 3 coats of white with about 1 hour between each coat. 


After the last coat of white, remove the tape before it dries completely, but not while it is still very wet. Allow some extra drying time to make sure that all layers are completely dry. The next step is to lightly sand your pattern. You may end up with some 'edges' where the tape was, and you'll want to lightly sand these and the entire area so you have a nice smooth surface for the lacquer. 

Wipe down the surface again making sure it is dust free before applying the first coat of lacquer. Then apply the first coat of lacquer in the same manner as the paint. This will need a much longer time to dry. I left mine overnight. 

Once completely dry, sand the entire surface. I used 1000 grit sandpaper. You don't want to scratch the surface, just make sure that it is smooth. Clean up the dust and apply a final coat of clear lacquer. 


Once it's dry, peel away the rest of the tape and admire your work! Let's have one more look at the before...

Tired old coffee table made fresh and new! Easy! and only $11.


Cost:
  • Table - on hand 
  • White spray paint - $7 at home depot
  • Clear lacquer - on hand
  • Painter's tape - $4 at home depot
  • Sand paper - on hand
Have fun with your project and be sure to link to photos in the comments. We'd love to see what you choose to brighten up!

***************************************************
When she isn't refreshing furniture, Kat is busy designing and building her line of Hand Crafted Eco Luxury Jewellery & Accessories at aeliosdesign.