Tuesday, January 25, 2011

Tutorial Tuesday - Wire Ribbon Bags

You will need
Wire edged ribbon - width your choice, use whatever you have around the house
Scissors
Glue Gun
Calloused fingers or a ruler


Cut a 7" length of ribbon and fold the wrong side together leaving about a 1" edge showing, this edge will make the flap, you can make it larger if you wish, but it will make your bag smaller.


Fold over a small seam allowance on the 1" edge.


Glue the small seam together with your hot glue gun. Press the edge down with your fingers (if you can tolerate the heat) or use a ruler to smooth the edge out.


Glue the wrong side edges together and smooth out with your fingers or a ruler.


Fold over the flap.


Easy peazy lemon squeezy! A bag for your jewellery creations.


I used 3" wide ribbon for this tutorial, but you can use any smaller width, just reduce the length of your original cut so your finished product is square. For 1" ribbon I cut about 3". Play with it a bit to get the sizes you need.

You can use ribbon without wire but I like how the bags hold their shape when you use wire edged ribbon. I also recommend solid fabric, sheer ribbon makes a see through bag, which personally I think isn't as attractive or as much fun when using for a gift.

Honestly I use whatever I can get on sale, find at the thrift store, or salvage from leftovers from friends wreath making projects. It all makes cute gift bags for a very reasonable price.

This is not my original idea, I once purchased an item of jewellery several years ago and it came in one of these bags, wish I could remember who from!

This tutorial was originally published at periwinkledzyns.blogspot.com

Homemade Marshmallows


Homemade marshmallows have been in vogue for the last couple of years, and it's no wonder why. These little candies are delicious and make impressive gifts. They are also surprisingly easy to make, and can be customized in so many ways. All in all, homemade marshmallows make a great Valentine's Day gift for neighbours and family - or yourself! And if you're not into Valentine's Day (like me), you could plop one into a nice cup of hot chocolate - it's the perfect cure for winter blahs.

Originally marshmallows were made from the root of the marshmallow plant and egg whites and sold as medicine. Nowadays marshmallows are a candy made by combining a cooked sugar syrup with gelatin. I followed the recipe at joyofbaking.com, but every marshmallow recipe follows approximately the same proportions. You can play around with the amount of sugar (some recipes call for only 1 1/2 cups, some for 2 cups) and corn syrup. Feel free to customize your marshmallows by replacing the vanilla extract with other flavourings, or even liqueur Just be aware that some flavours are stronger than others, so if you're going with something like peppermint or almond, reduce the amount of extract in the recipe to taste. If you're a vegetarian, you might want to try replacing the gelatin with agar agar flakes, or you could try out a traditional recipe made with real marshmallow root.

You'll definitely want to use a stand mixer fitted with the whisk attachment for this recipe.


Here is the basic recipe, generalized from many sources:

Ingredients
3 envelopes gelatin ( 2.5 Tbsp or 12 sheets)
1/2 cup cold water

2 cups sugar
1 cup light corn syrup
1/2 cup water
1/8 - 1/4 tsp salt

2 tsp vanilla, or the flavouring of choice
food colouring, if desired

plenty of confectioner's sugar for dusting

Method
-Grease a 9 x 13" pan, and line with parchment paper. Dust heavily with confectioner's sugar.

-Put gelatin and cold water in your mixing bowl. Let stand to soften.


-Make the sugar syrup. In a medium sauce pan, stir together the sugar, corn syrup, salt and water. Wash down sides of the pan with a wet pastry brush. Clip on a candy thermometer, and cook the mixture until it reaches 220F (soft ball stage). Take the pan off heat immediately.


-With mixer on low speed, slowly pour the syrup into the softened gelatin. Increase speed to high, and beat mixture until it is thick, white and fluffy. This will take between 5 and 15 minutes. Add vanilla (or other flavouring) and food colouring, if using, and beat for another 30 seconds to one minute more.


-Scrape the mixture into the prepared pan, using a dampened rubber spatula. The mixture will be extremely sticky, so just do your best here. Generously sprinkle the top with confectioner's sugar. Let stand, uncovered at room temperature for 6 - 12 hours, depending on humidity.


-Generously dust a cutting board with confectioner's sugar. To remove marshmallows from pan, cut around the edges of the pan with a sharp knife. Either turn the pan over onto your prepared cutting board, or pull the entire marshmallow out if that works better for you. Peel off the parchment paper, and cover with confectioner's sugar. Cut the marshmallow slab into desired shapes, with a sharp knife or cookie cutter. The marshmallows will be very sticky, and you'll probably have to stop and clean your knife several times. Keep the marshmallows small as they are very sweet and rich. A little goes a long way!


-Decorate as desired. The cut edges will be extremely sticky and need to be coated with something to keep them in tact and moist. There are no limits here! Simple ideas include confectioner's sugar, toasted coconut, cocoa powder.

Store marshmallows in a parchment lined container at room temperature. Marshmallows will keep for at least a week or two, depending on humidity.


These would look so cute in tiny packages, wrapped up with brown paper and pretty ribbon! Your friends and neighbours will love you!


Friday, January 21, 2011

I just wanted to share with you ladies a great Facebook Page my friends Melanie and Jennifer put together. It's a place you can go to post or look for any workshops going on in the city. Be sure to check it out, share the link and let us know if you have an event you want to post! WINNIPEG WORKSHOPS!
-andee from Sew Dandee

Tuesday, January 18, 2011

Tutorial Tuesday: Cozy Upcycled Fabric Earmuffs


It's cold out there! And it will be for at least another 2 months here in Winnipeg, Manitoba, Canada. So I might as well be warm and fashionable, and use up some of my upcycling pile while I'm at it.

These cozy fabric earmuffs are fun and fashionable! And they don't have any of those awful plastic pieces that bite into my head and pull out my hair when I try to take them off.

Wanna make a pair for yourself or perhaps gift a pair to a loved one?

Fit:
Adult size medium. They fit me and they stretch to fit a bigger head with bigger brains too!

Time Needed:
About a half hour.

Skill Needed:
A little tricky with the elastic and sewing the earpieces to the headband. I'd say about medium skill.

Supplies Needed:
- About 0.25 metre of fabric (I recommend fleece for cozy comfort - an old sweater also works wonderfully)
- Scrap of Quilt Batting
- 4 inches of elastic (I use scraps that I pull from various "to be upcycled" clothing)
- matching thread
- 2 safety pins
- free downloadable pattern - located here

Step One:
Download the pattern PDF and print. I apologize for the lightness of the ink. I couldn't find my marker and then I had a whole thing about getting my scanner to work with my new OS. Bleh. If I get in the mood to figure out how to darken it (or find my marker) I'll fix it.
Cut out 1 headband piece (on fold) from chosen fabric
Cut out 4 Ear Pieces from chosen fabric (you can use fleece for inside and decorative fabric on outside if you wish)
Cut out 2 earpieces from quilt batting
Cut out 1 (on fold) of bottom band from chosen fabric
Use the bottom band piece to measure how much elastic you need - this time, don't cut on fold. It should be close to 4 inches.


Step Two:
Fold both the headband piece and the bottom band piece in half lengthwise. Sew along the long edge. Use a safety pin (or your own desired method) to turn both pieces right side out. If you'd like a puffier look to your top headband piece, you can use a piece of quilt batting on the inside as well.


Step Three:
Layer the headband piece, the earpieces and the quilt batting in this order.
One earpiece (right side up) - this would be the piece you intend to be on the inside (touching your ear)
The headband piece with the seam in the middle facing down
One outside earpiece (right side down)
One piece of quilt batting

Repeat for the other side of the headband.

You'll get something similar to the picture below. Make sure everything lines up and that the earpieces are all placed together with the headband piece as shown.


Here's another picture from a different angle to give you a better idea of what you'll have when you pin it together


Step Four:
Starting close to where the headband piece and the earpieces match up (along the bottom of the earpieces) sew carefully around the earpieces, making sure to leave a hole where the headband piece is.

(Don't you just love my quick GIMP work? Hehe, not so good with the paintbrush tool, but you get the idea)


Turn the earpieces right side out using the hole you left in your stitching.


Step Five:
Carefully pin the elastic to one end of the bottom band with a safety pin. With another safety pin inserted at the other end of the elastic, carefully thread the elastic through the bottom band. The bottom band will be longer than the elastic, so be careful not to lose that elastic in there!
Without losing the end of the elastic, pin the bottom band to the bottom of the earpiece (where you left the sewing hole in the above step). Do the same with the other end onto the other other earpiece.
Stitch the hole closed making sure to capture the end of the elastic and the bottom band within the stitching. Do the same for the other ear.


Ta Da! If you can get through all that weird and funky sewing, you will have a cool pair of earmuffs!


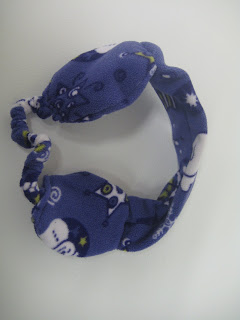
And of course, if you don't want to try out all that weird and funky sewing, you can purchase a pair at Tawny Bee. The above purple fleece pair is available here.


I also have a sweet red checkered pair, with red fleece inner ears - available here.


You can also cut out a silly sweater, making sure to get something cool on the ears. This Bear Bottoms one is a little cheeky and super soft and warm - available here.

Corduroy also works as a great outer fabric with a soft velour on the inside of the ears. This pair is available here.

And because I believe is sharing, you can use my pattern in whatever way you see fit. You can make a pair for yourself, a friend, a gift, or make them to sell - of course I won't complain if you'd like to put "Tawny Bee Pattern" on the description of the earmuffs you sell ;) Whatever you like! Enjoy!

____

This tutorial was originally featured on my blog The LT Experience on January 13th, 2011

Tuesday, January 11, 2011

Navigating Canada Post


As I begin the annual ritual of adjusting the shipping prices in all my Etsy listings, I thought it might be an opportune time to share some of the knowledge I’ve gleaned about shipping with Canada Post.

Running an online shop means you’ll be mailing a lot of packages. That makes dealing with the post office a necessary evil (unless you use Paypal to print out shipping labels, of course, but that is a topic for another post). I’m pretty sure I made every mistake there is when I first started selling on Etsy. Learning the ins and outs of Canada Post cost me a lot of time and money! With a little knowledge and planning you will be able to enjoy a much smoother and less expensive process.


1. Know Thyself (and thy package)

The best thing you will ever do for your online store is to buy a digital scale. Most sellers will probably be able to get by with a simple kitchen scale. These are available (cheap!) from places like Walmart or Canadian Tire. Always weigh your item along with any and all packaging that will be used. It also helps to know the dimensions of the envelope or box you’ll be using to ship the item, because each shipping option has size limits. Use this information to look up shipping prices before you list.

Speaking of shipping options, get to know the services you are using. Learn exactly what you will need and get comfortable enough to be able to ask for it by name. Once I had done my research I was astounded at how much incorrect information and bad advice was given out by the clerks at the post office. Head over to Canada Post’s website and print out the information sheets available in this section.


2. Understand you options

Here is a quick overview of the services most likely of use to you, their standards, restrictions and pros and cons. Be aware that a fuel surcharge may or may not apply when you mail your item depending on the current price of gas.


Shipping in Canada

Shipping within Canada is tricky to gauge. There is only one service available for parcels. Rates are calculated based on size, weight and how far the item has to travel. Items sent within the city and province will cost around $8 (and up, as weight increases). There are several rate codes within each province, but in general packages sent to destinations outside of Manitoba will start at about $10. Sending an item to a fellow Canadian is often more expensive than shipping to the U.S. because Canada Post is responsible for the entire delivery rather than just getting the package to the border. The upside is that it will likely reach its destination slightly faster (2-9 days), and delivery confirmation is included.


Shipping to the USA

Light Packet: The cheapest option available for most items (unless you are able to use letter mail), and it goes by air. There are no options or features available with Light Packet, and no included coverage for loss or damage. Watch out for the size limitations: the maximum height for this option is 2cm, and maximum weight is 500g.


Small Packet (surface and air): This is the service I use most often. It applies to packages under 60 cm long and under one kilogram. The rates for airmail are a bit higher than surface, but it does make a difference in delivery times. A package shipped surface mail has a delivery standard of 6-12 business days whereas airmail is expected to arrive in 4-10 days. Coverage up to $100 is included, but there is no tracking service or delivery confirmation available.


Expedited Parcel: This is the service for larger heavier items. Rates are based on your location and where the item is going. Expedited Parcel costs significantly more than Small Packet, but expected delivery time is quicker (4-8 business days between major centres) and both tracking and delivery confirmation are included.


Shipping Internationally

Etsy is expanding! There is an increased focus on recruiting buyers and sellers overseas which means a higher chance that your item may be purchased by someone halfway around the globe. Shipping internationally is easy. Small Packet service is offered for packages up to 60cm long and 2kg in weight. Delivery is available to international destinations all over the world, and price depends on where you’re sending to. It’s a good idea to research rate zones for Europe and Australia because many of your Etsy customers are located there. Surface shipping is much cheaper than air mail, but be prepared; delivery standards for surface are 4-6 weeks, and, yes, it really will take that long. There is no tracking or delivery confirmation available, but your item is automatically insured for loss or damage up to $100.


3. Understand the expectations of your customers

In general, customers from the US are used to much faster and cheaper mail service than we are. USPS has much lower rates, offers more services and delivers faster than Canada Post. Many customers in the US will not be aware of the increased cost of obtaining a tracking number. It helps to post and fully explain services and delivery standards in your shop policies. Remember that a delivery standard of 6-12 days is 6-12 business days, Monday to Friday only, not including holidays and not including the day the package was sent. If there are holidays in there, 12 days can actually stretch into almost three weeks! Remember that your package has to go through customs, and delays there are completely unpredictable. Be prepared to answer questions from your American customers in a factual and understanding manner. When sending packages across the border or to international destinations, always check the list of prohibited items and follow all guidelines to ensure your package won’t be held up unnecessarily.


By planning ahead before listing your item, and gaining familiarity with the services offered by the post office, you’ll never receive an unwelcome surprise from Canada Post. A thorough knowledge of Canada Post’s services and guidelines also enables you to deal effectively with your customers. With an informed and streamlined shipping process, you can feel confident sending your items all over the world.


Wednesday, January 5, 2011

W.E.S.T. Design Challenge: January Inspiration


Welcome to the first design challenge! The inspiration topic for this month is "Winter Forest".

If that conjures up woodland animals, trees, secret hiding places or winter fashion and accessories, you'll be right on track with etsy's hot topics for January. Don't feel limited, though! The goal is to challenge yourself, get inspired and convey "winter forest" in a way that's meaningful to you.

Each month we will post the "inspiration" on the blog. Your job is to take that inspiration in whatever direction your imagination leads. This is a great way to connect with the local community, promote your items, challenge your creativity, and explore your artistic vision.
We will be coordinating the monthly inspiration with etsy's marketing and merchandising directives for the month (available in the Storque). This can help give a boost to the visibility of your store and items if you choose to list your entry in your etsy shop.

Here's how it works. Check the ning and blog at the start of the month to get the inspiration topic. As you mull over what that particular idea means to you, jot down some notes in the discussion thread or leave a comment on the blog. Take pictures of your process and finished item and post them in the thread or in the Flickr group (with the tag W.E.S.T._dc). We would love to hear the story behind how you arrived at your finished object! I will blog the results of each month's challenge. Hopefully we'll be able to put together a treasury of the items, as well.
A few notes: Create something especially for the challenge. Entries for each month should be finished by the last day of the month. Vintage and supply sellers are welcome to participate, too, with a focus on artful photography and careful choice of item.
Good luck! I hope this inspires you, and I can't wait to see what you'll come up with!